EvertDekker.com

Evert Dekker
  • Home

Search

Recent Posts

  • Raspberry Pi Power distribution board
  • Doublelock Sensor
  • Nixie Clock #3
  • Iot house exhaust air systems controller
  • PZEM-016 Energy Monitor

Projects

  • expandCode Vault (14)
    • expandArm Cortex (1)
    • expandBascom (10)
    • expandMini2440 (1)
    • expandVB 5..2010 (2)
  • collapseElectronic Projects (66)
    • expandEsp32 (4)
    • expandEsp8266 (13)
    • expandJoshua Domotica (25)
    • expandOldies (3)
    • expandRc Car Projects (4)
    • expandVarious Projects (17)
  • expandSoftware (9)
    • expandArduino (1)
    • expandJoshua (1)
    • expandNokia N900 (1)
    • expandPC (6)
  • expandVarious projects (3)

Popular Posts

  • Raspberry Pi Power distribution board
  • Raspberry Hat board template Altium
  • Iot SensorV2 with battery onboard
  • Contact me
  • PZEM-016 Energy Monitor

Archives

Menu

  • My Tube
  • Contact me
  • Privacy Policy

Counters

  • 1259651Total reads:
  • 0Reads today:
  • 340Reads yesterday:
  • 2405Reads last week:
  • 2693Reads per month:
  • 416780Total visitors:
  • 0Visitors today:
  • 175Visitors yesterday:
  • 1210Visitors last week:
  • 1360Visitors per month:
  • 173Visitors per day:
  • 0Visitors currently online:
  • September 9, 2007Counter starts on:

My Github Projects

  • Blinkled
  • DHT22-Esp8266-HW-Test
  • DHT22-ESP8266-Temperature-Node
  • ESP8285-Sonoff-Slampher-V2
  • IotPirLight

Meta

  • Log in
  • Entries feed
  • Comments feed
  • WordPress.org

Iot Blinds Controller

Nov12
by Evert on November 12, 2018
Posted In: Esp8266

This is a renewed and updated version of my blinds controller. With this controller we can lower and raise the horizontal Luxaflex blinds. This controller was one of the first devices in my Joshua Domotica and the controller for one of the bedrooms needed to be replaced.

Just like my previous Esp8266 and Esp32 domotica projects it will connect through Mosquitto with Node-red. With the help of Node-red we can control the blinds and do almost everything we want with it.

The hart of the design is the Esp8266 and a DRV8800 full bridge motor driver. With the h-bridge we can control the direction that the 24V motor of the blinds will turn and therefore lower or raise the blinds .
With the help of the Enable pin and pwm (pulse wide modulation) it’s possible to let motor run on lower speed to tilt the blinds for example half way the window.
Because the motor requires 24V to operate and the Esp8266 only 3.3V we needed a buck convertor to step down the 24V with a minimum of loss to 3.3V. For this buck convertor I simply bought a ready made one from Ali express.

To suppress the inrush current for the motor some electrolytic capacitors were added to prevent the Esp8266 for resetting due to a dip in the power supply. Note: In the schematic C4 has a value of 1000µF, but this should be just like C1, 220µF. Btw the value of R8 is also incorrect, see below. I really should update my schematics sooner and better.

Because the blinds doesn’t have end switches or other feedback, the only way to determine where they are is the time when the motor is running and in what direction, it’s mostly done by the software. To determine if the motor runs there’s a current sense resistor added to the DRV8800. Over this resistor is an 1.8V zenerdiode mounted to prevent to high voltage on the analog input of the Esp8266.
The 1Ω resistor on the photo is replaced with a 0.5Ω 1210 resistor because the DRV8800 was not working with 1Ω. According to the datasheet this will exceed the maximum sense voltage.
You read those things in the datasheet after you find out it’s not working correct. Due to the smaller resistor the voltage drop is also smaller and it’s not possible anymore to use the full AD range of 1V of the Esp8266. We can still detect if the motor is running or not, but in a next design there should be an op-amp added to amplify the signal.

The pcb was designed very compact. I bought a small box 53x35x23mm and made the pcb to fit exactly in this box. The pcb is mounted on the back of the switch to make it one and save some space for mounting holes. The pcb is 1mm thick to save also some space in the height. Very nice design if I may say so.


Schematic Schematic
Bare Pcb Bare Pcb
Finished Pcb Front Finished Pcb Front

Finished Pcb Back Finished Pcb Back
Pcb Mounted in Enclosure Pcb Mounted in Enclosure
Finished Enclosure with button Finished Enclosure with button


Demo Blinds Controller


If want to make your own, or use some parts from the design, here are the Altium 16 design files.

Download Now!
1050 Downloads

 Comment 

Esp32 jtag debugger with Sloeber

Oct01
by Evert on October 1, 2018
Posted In: Arduino

This is a step by step instruction to setup Sloeber “The Eclipse Arduino Ide” with OpenOcd and a FTDI 2232HL as debugger. With this you can debug your Arduino sketch real time on an Espressif ESP32 in circuit with jtag.

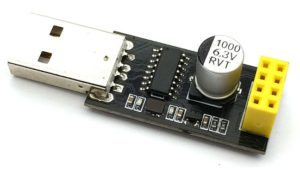
As hardware for the debugger I used 2232HL board from Ali-express , this one was around $14. However every board with a FTDI 2232hl will work.
The 2232HL is a 3.3V device so don’t connect to 5V hardware or else the smoke will escape and the 2232HL will stop working.

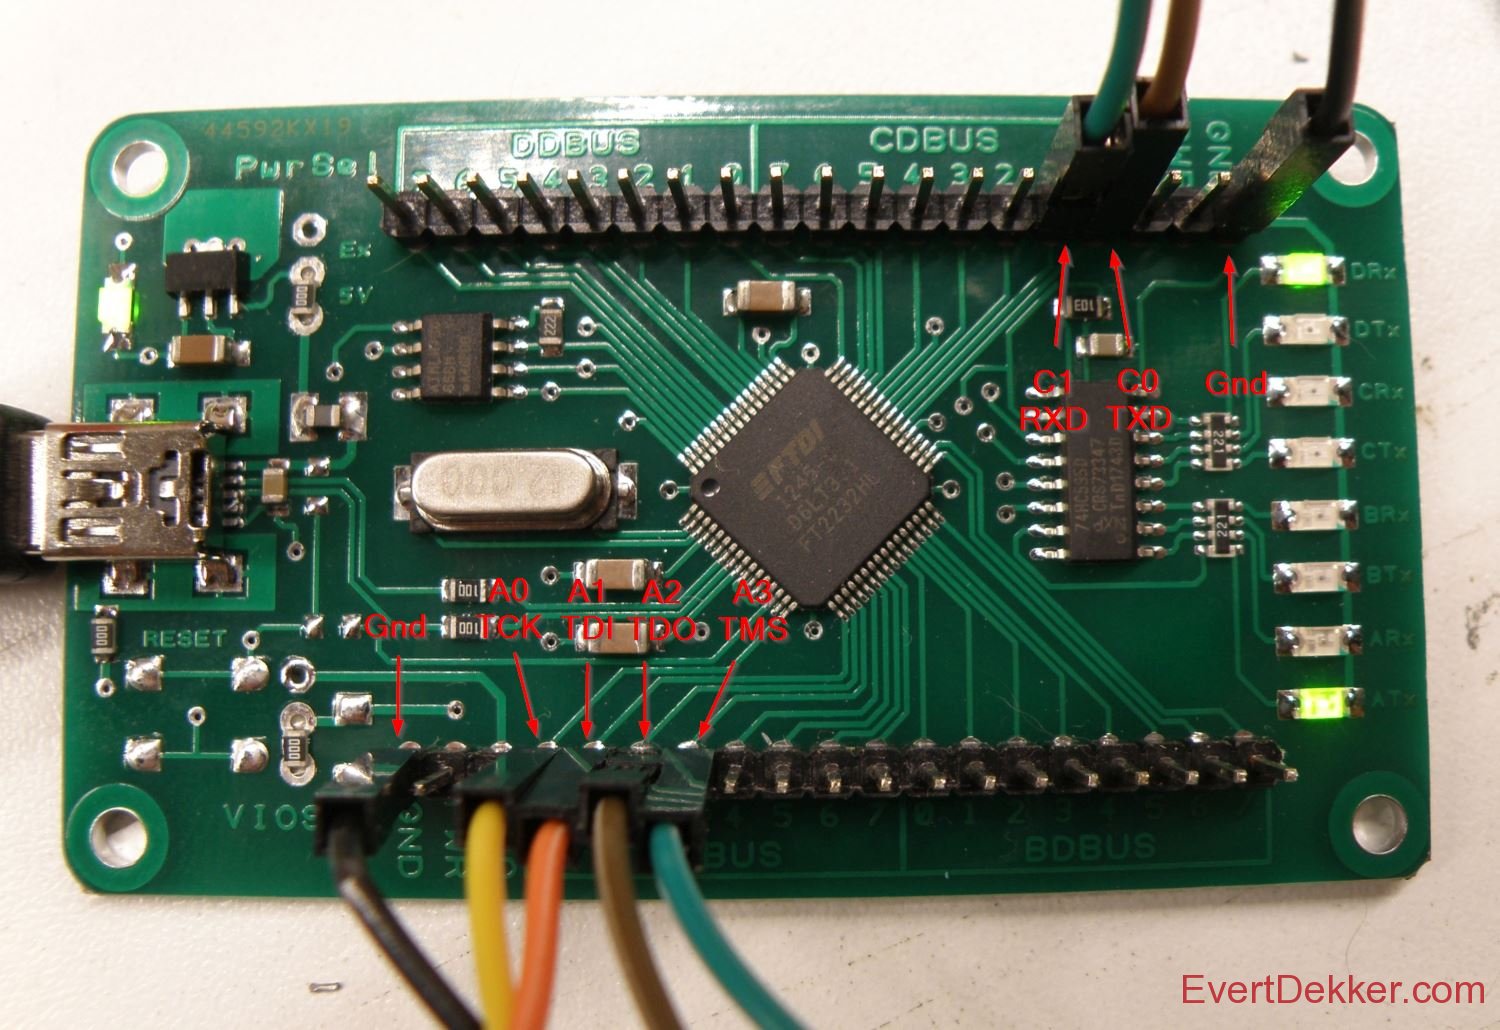
You need to connect it like this to your hardware:
AD0 – TCK (Gpio13)
AD1 – TDI (Gpio12)
AD2 – TDO (Gpio15)
AD3 – TMS (Gpio14)
GND – GND
Optional serial port:
CD0 – TXD (Gpio3)
CD1 – RXD (Gpio1)

FTDI FT2232HL jtag


Installing Sloeber “The Eclipse Arduino Ide”

  1. Download Sloeber
  2. Extract the gz to the directory of your choice, in this tutorial we use c:\sloeber
  3. Let’s setup some basic stuff for Sloeber.
  4. Arduino -> Preference -> platform and boards
  5. Check Arduino AVR boards and esp8266 2.4.2 (or newer) both are not really necessary for the esp32, but it’s nice to have some samples and libraries.


Installing Esp32 Arduino and Sdk

  1. In Sloeber File -> Import -> Projects from git -> Clone URI and copy the url  https://github.com/espressif/arduino-esp32.git in the URI field.
  2. Press next and uncheck all the branches except master, press next again.
  3. Change the directory to C:\sloeber\arduino-esp32 and press next again.
  4. Choose Import as general project and press next again.
  5. Let’s add it to the ide, Arduino -> Preferences -> Platforms and boards
  6. Press the new button next to the Private hardware path and enter C:\sloeber\arduino-esp32 in the path box.
  7. Press Apply and close
  8. Now we need to download the Esp32 sdk, browse with windows to C:\sloeber\arduino-esp32\tools and click on get.exe
  9. Done


Replace the FTDI by Winusb driver

  1. Download Zadig , no need to install just run it.
  2. Click Options -> List All devices
  3. Choose in the dropdownbox USB <-> Serial Convertor (interface 0).Be careful here that you select the correct device.
  4. Choose the WinUSB (V6.1.xxxx.xxxxx) driver and press the Install driver button
    Note: For some reason sometimes (win update?, other usb port) windows will roll back to the original FTDI driver and you have to do this again.


Installing OpenOcd

  1. Download OpenOcd for the Esp32 from Github (I have used 0.10.0 20180920 version)
  2. Extract the content to C:\Sloeber\Openocd
  3. Download the cfg file for the debugger and place it in C:\sloeber\openocd-esp32\share\openocd\scripts\interface\ftdi
    Note: this file is for the Ftdi 2232HL based debugger that I have. For other debugger look in the C:\sloeber\openocd-esp32\share\openocd\scripts\interface directory. This cfg file can work with other Ftdi based hardware, but I can’t guaranty nor support that.
  4. Connect your debugger to the Esp32 hardware and let’s see if it works by typing on the command line: C:\sloeber\openocd-esp32\bin\openocd.exe –f c:\sloeber\openocd-esp32\share\openocd\scripts\interface\ftdi\quantum.cfg
    cmd Test Jtag
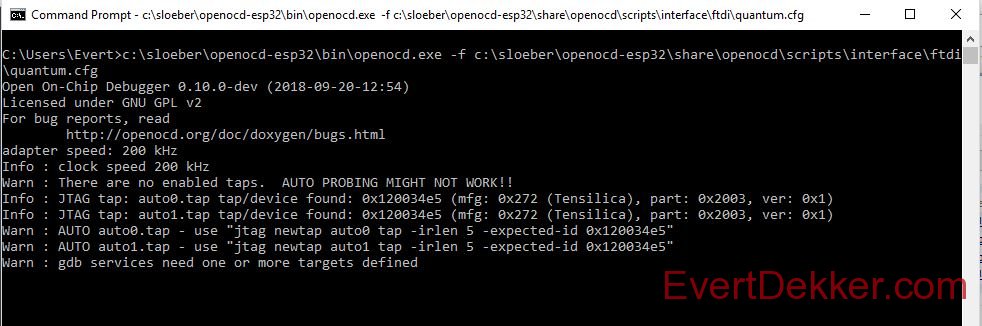
  5. If you get something as in the picture above with the “device found …..Tensilica” in it you rock. The hardware and OpenOcd are working


Setting up a new sketch

  1. Lets start a new project, Arduino -> new sketch, give the project a name and press next
  2. Platform holder c:/sloeber/arduino-esp32 , fill in the rest with the board etc you have. Port is the comport your board is connected to, not the jtag. Press next
    New Project Settings
  3. Choose Sample sketch -> example -> 01.basics and check blink. Press finish
  4. We need to set some build options for the debugger, right click on your project map, Arduino -> tab compile options and enter in the append to C and C++ field -ggdb -Og. These compiler options are not needed for a production version.
  5. Let’s compile, press Arduino -> verify
  6. And upload it to your board Arduino -> upload sketch. If you have a led connected to the pin as defined in the sketch is should blink now.


Setting up the debugger in Sloeber

  1. Right click in the project explorer window on your project and choose Debug as -> Debug configurations.
  2. Choose GDB openOCD debugging and add a new configuration by clicking on the + at the left upper corner.
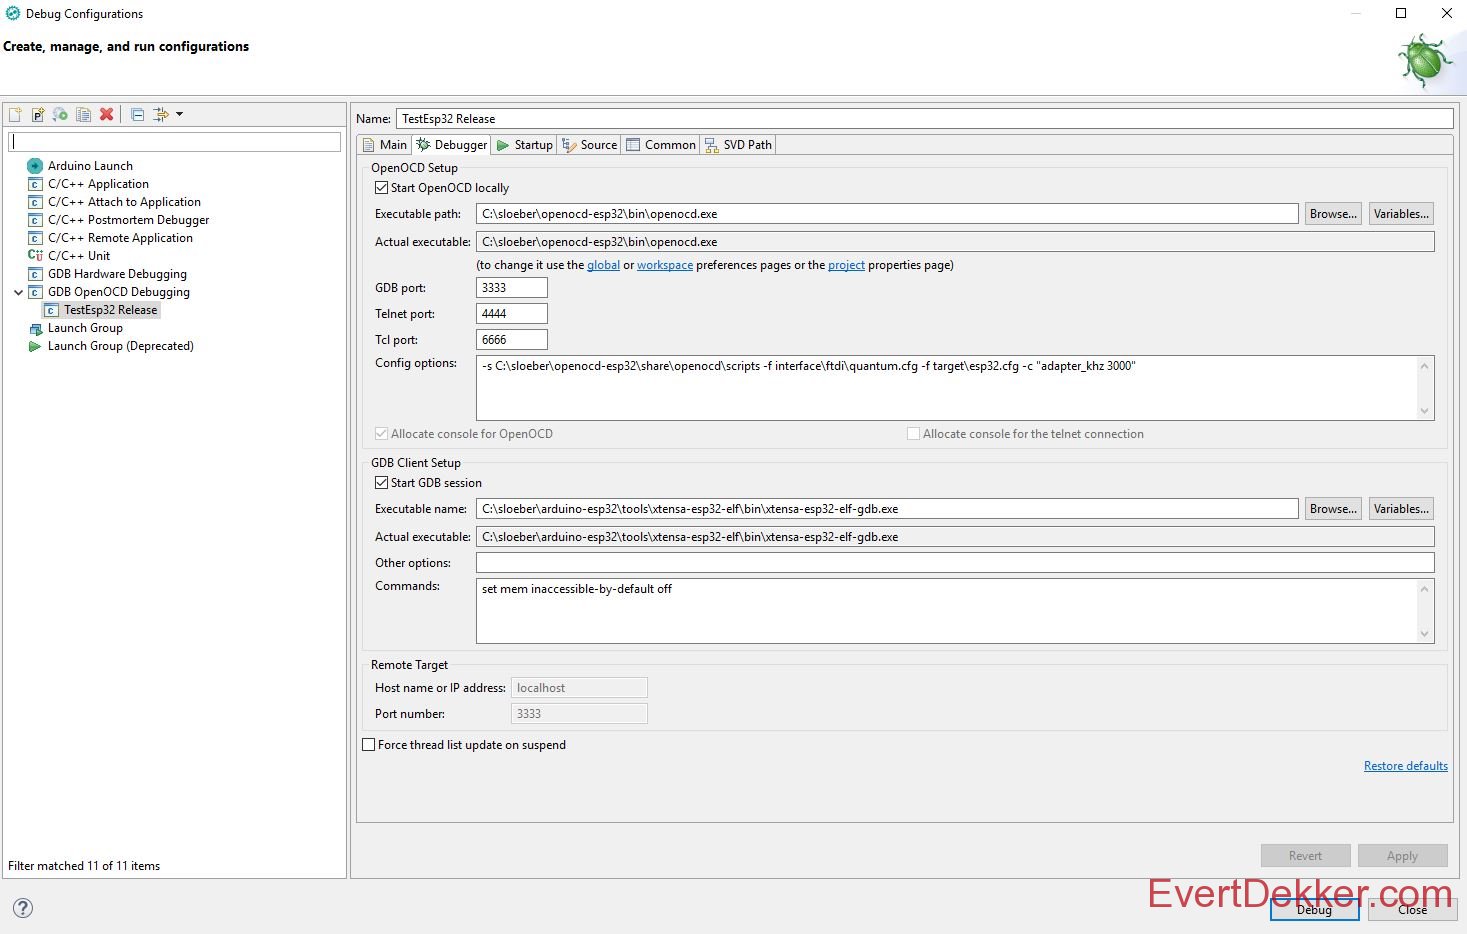
  3. On the debugger tab check Start OpenOCD locally
  4. Executable path will be C:\sloeber\openocd-esp32\bin\openocd.exe
  5. GDB port: 3333
  6. Add to Config options -s C:\sloeber\openocd-esp32\share\openocd\scripts -f interface\ftdi\quantum.cfg -f target\esp32.cfg -c “adapter_khz 3000”
  7. Check Start GDB session
  8. Executable name for the GDB client will be C:\sloeber\arduino-esp32\tools\xtensa-esp32-elf\bin\xtensa-esp32-elf-gdb.exe
    Debugger tab
  9. Select the Startup tab and set these settings
  10. Check Initial reset, Type: init
  11. In the command box enter:
    target remote:3333
    mon reset halt
    x $a1=0
  12. Uncheck Enable ARM semihosting
  13. Check load symbols, use project binary should be already have your project name
  14. Uncheck Load executable, debug in ram, Pre-run, Set program counter at (hex)
  15. Set the checkbox Set breakpoint at and fill in textbox loop
  16. Check Continue
    Startup tab
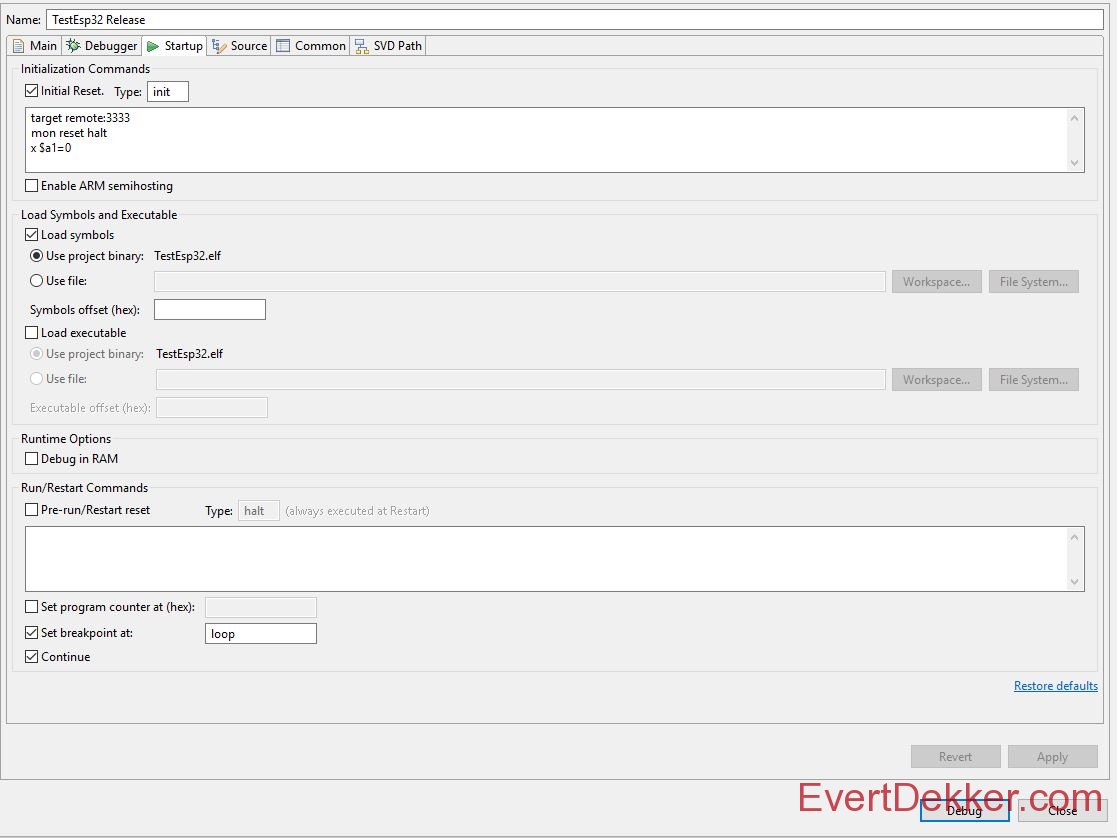
  17. Press the Debug button and there you go

You can also program the ESP32 automatic with the jtag before debugging, add in the command box as described in step 61. below the target remote:3333 line
monitor program_esp32 c:/users/evert/Documents/sloeber-workspace/Testesp32/release/Testesp32.bin 0x10000 verify
Note: It was not possible to use in the command box Eclipse variable like {project_loc}, this would be handy so you don’t have to change every project the hard coded path. These variable like {project_loc} contains backslash “\” and GDB expects forward slash”/”. I did  a lot of Google reading but couldn’t find a solution, if you have one let me know.


How to use it?

It’s a bit out of scope of this tutorial how to describe full the debug function in Sloeber. Because Sloeber is based on Eclipse there is enough videos etc available to help you out.
To start a debug session you have to Right click your project -> Debug As -> Debug configuration and press debug. Sloeber will then switch to the debug perspective
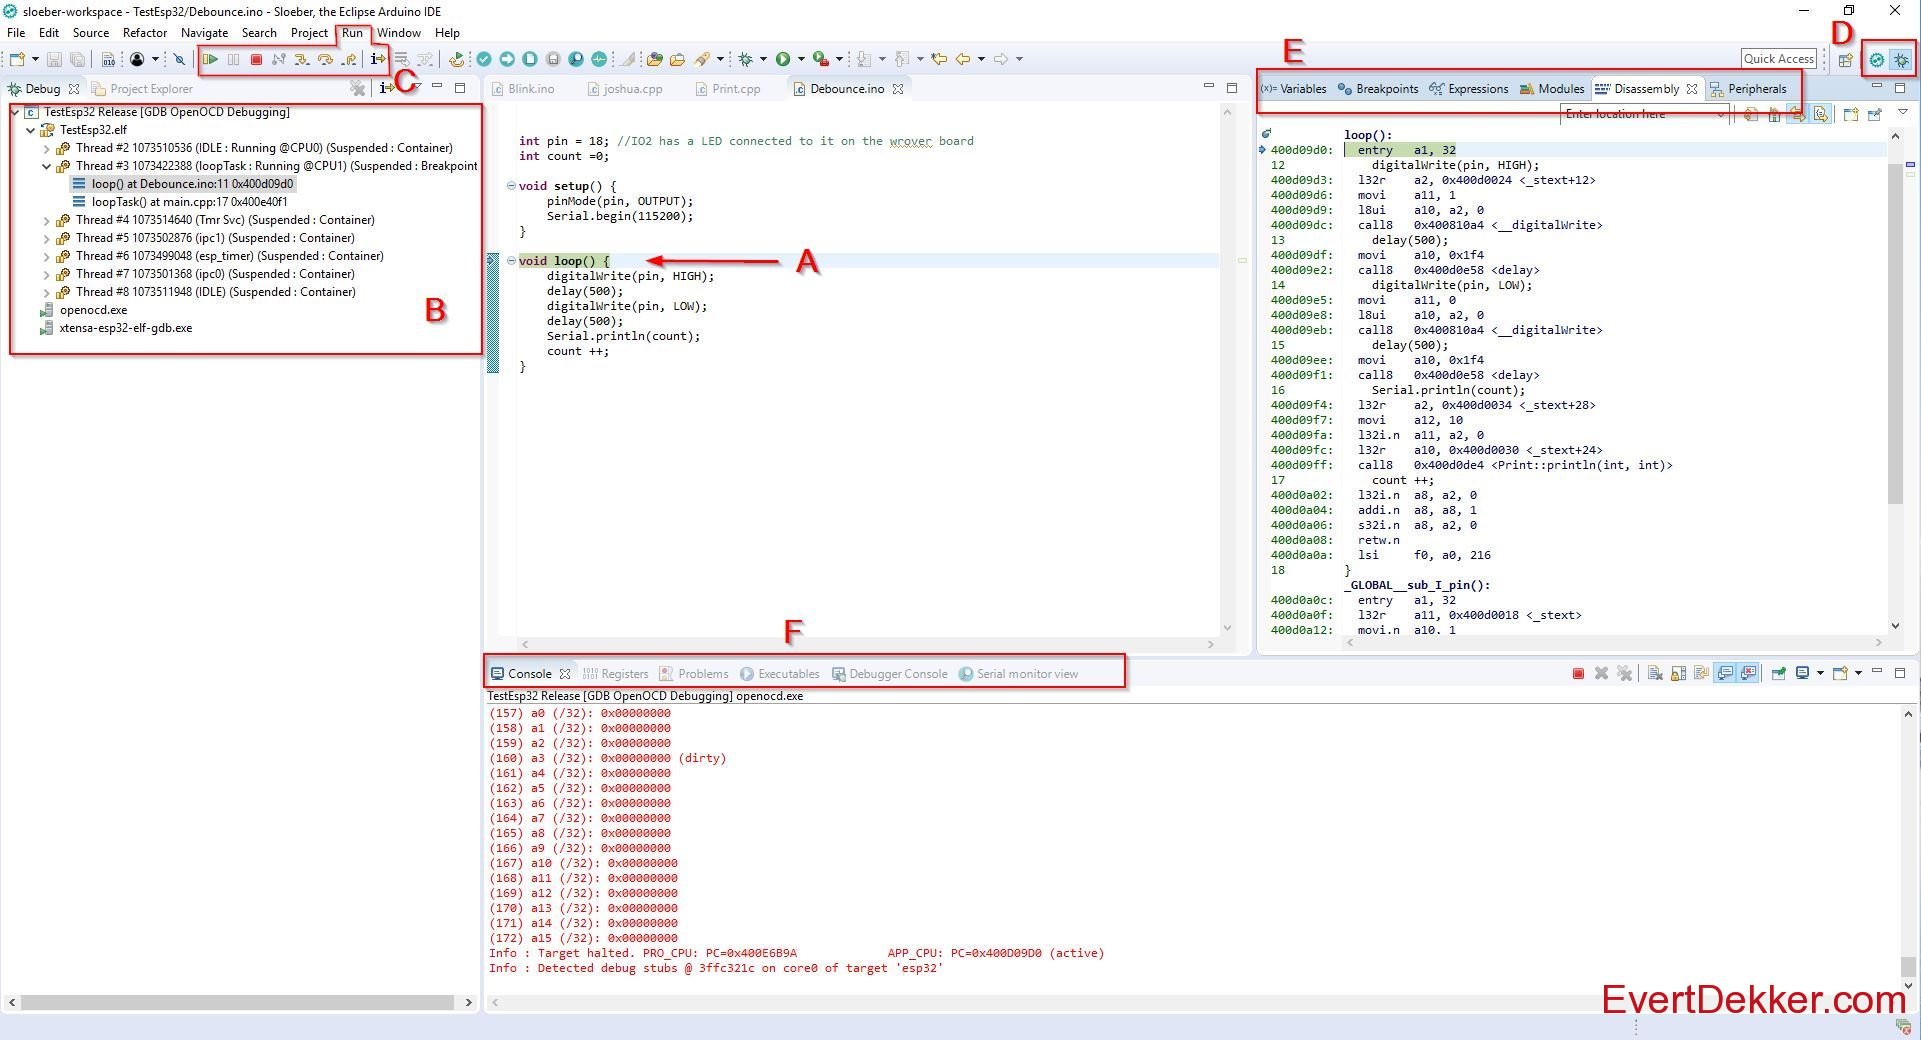
As a quick reference have a look at this:

  1. Program code window, program is paused at loop(), this because we set this in step 65.
  2. Thread window, here you can see all the threads that are running on the Esp32.
  3. Control buttons, with these you can start, pause, stop and step in various ways trough your code.
  4. Perspective view, you can switch between code and debug perspective
  5. Various windows to see and influence variable, breakpoints etc. Peripherals is unfortunately not working yet.
  6. Some more windows here, cpu registers and Serial monitor view are the most used.
debugviewtxt


Note: If you copy the settings direct from this page watch out that punctuation marks  like “ and ‘ are not copied correct (they have an other, wrong ascii value) and will give problems or error’s. Just retype them and it should work fine.

 Comment 

Iot Co2 Sensor

Sep25
by Evert on September 25, 2018
Posted In: Esp8266

For measuring the air quality in the living room I was looking for a CO2 sensor to build my own CO2 Iot node. Looking around on the internet I found the MH-Z19 sensor, not that expensive and according to other users this sensor is accurate.

A new project was born. The MH-Z19 was combined with a BME280 and TSL2561 so we can measure lux, temperature, humidity, air pressure and CO2 with one Iot node in the living room and send everything over Mqtt to Node-red for further handling and Sqlite database storage.
The biggest part of the design is a copy of my Iot Bme280 sensor module, this Iot sensor runs 40 days on one 18650 li-ion cell. However the MH-Z19 requires 5V and uses a lot more current so I thought it would be nice to power it from a power bank.
The esp8266 requires 3.3V so the 5V from the powerbank is stepped down with a PAM2305AAB330, very interesting stepping regulator that only requires 2 capacitors and 1 inductor. Little bit hard to get here in Europe, but luckily Arrow had “no shipping charge” days and the parts where quick and cheap here.
The MH-Z19 requires serial communication with the esp8266, the last one has power enough to do this with a software uart. Example for the Arduino IDE to get data out of the MH-Z19 was also quickly found. With all of this together the data was quickly streamed to the Mqtt broker.
The pcb was designed so that it will fit inside a Hammond 1591 case and the pcb is used like a sort of front panel this way. The MH-Z19 is milled out the pcb so you can mount it on the back.


Schematic Schematic
Pcb Bare Front Pcb Bare Front
Pcb Bare Back Pcb Bare Back
Finished Co2 Sensor Finished Co2 Sensor

Finished pcb front Finished pcb front
Finished pcb back Finished pcb back


If want to make your own, or use some parts from the design, here are the Altium 16 design files.

Download Now!
1222 Downloads

 Comment 
  • Page 3 of 30
  • «
  • 1
  • 2
  • 3
  • 4
  • 5
  • »
  • Last »

©2007-2021 Evert Dekker 2015 | Powered by WordPress with Easel | Subscribe: RSS | Back to Top ↑