Dwin Hmi display piggyback

My touch panel for the Joshua domotica in the kitchen needed an upgrade. The old touch display used the Rs485 wired network and was not capable of communicating with a Mqtt broker.
Looking at various brand Hmi (Human Machine Interface) touch display my choice was made for a display from Dwin. The popular Nextion display is nice to work with, but did not meet all my requirement ‘s. I wanted capacitive touch, higher resolution and a buzzer for feedback.
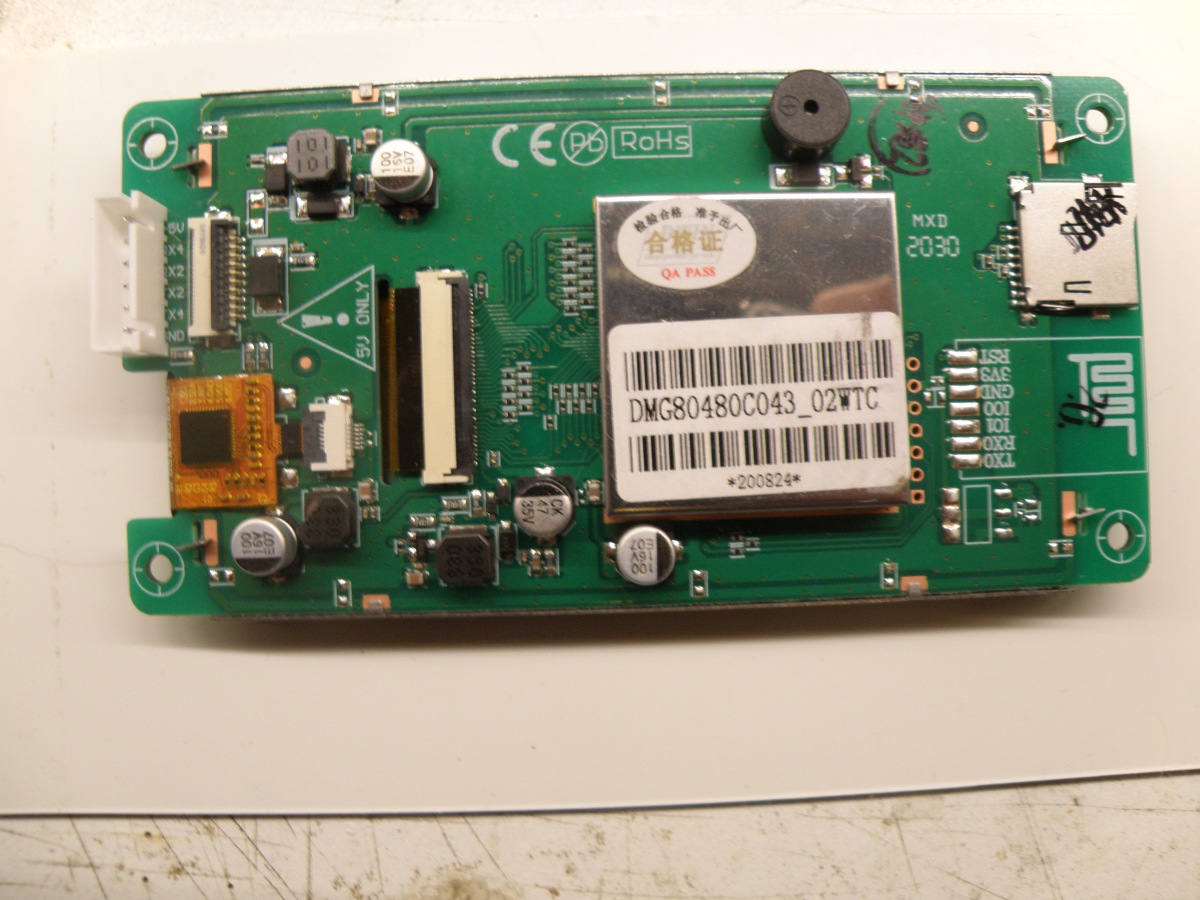
The Dwin display was purchased from Ali express for a very sharp price and the one I picked was the DMG80480C043, paid around €15 for it.
A 4.3” display with a resolution of 800×480, capacitive touch, buzzer and for communication with the world a serial port.

You can program the display with the free Dgus software. I recommend to stay for now to the V7 version, the V8 is still to unstable.
Holly cow, what is this all very bad documented by Dwin it took me along time to get the software under control and understand why it works and why it sometimes not works what you want to accomplice. Learned the most from a Russian forum that could I could read with the help of chrome translation.

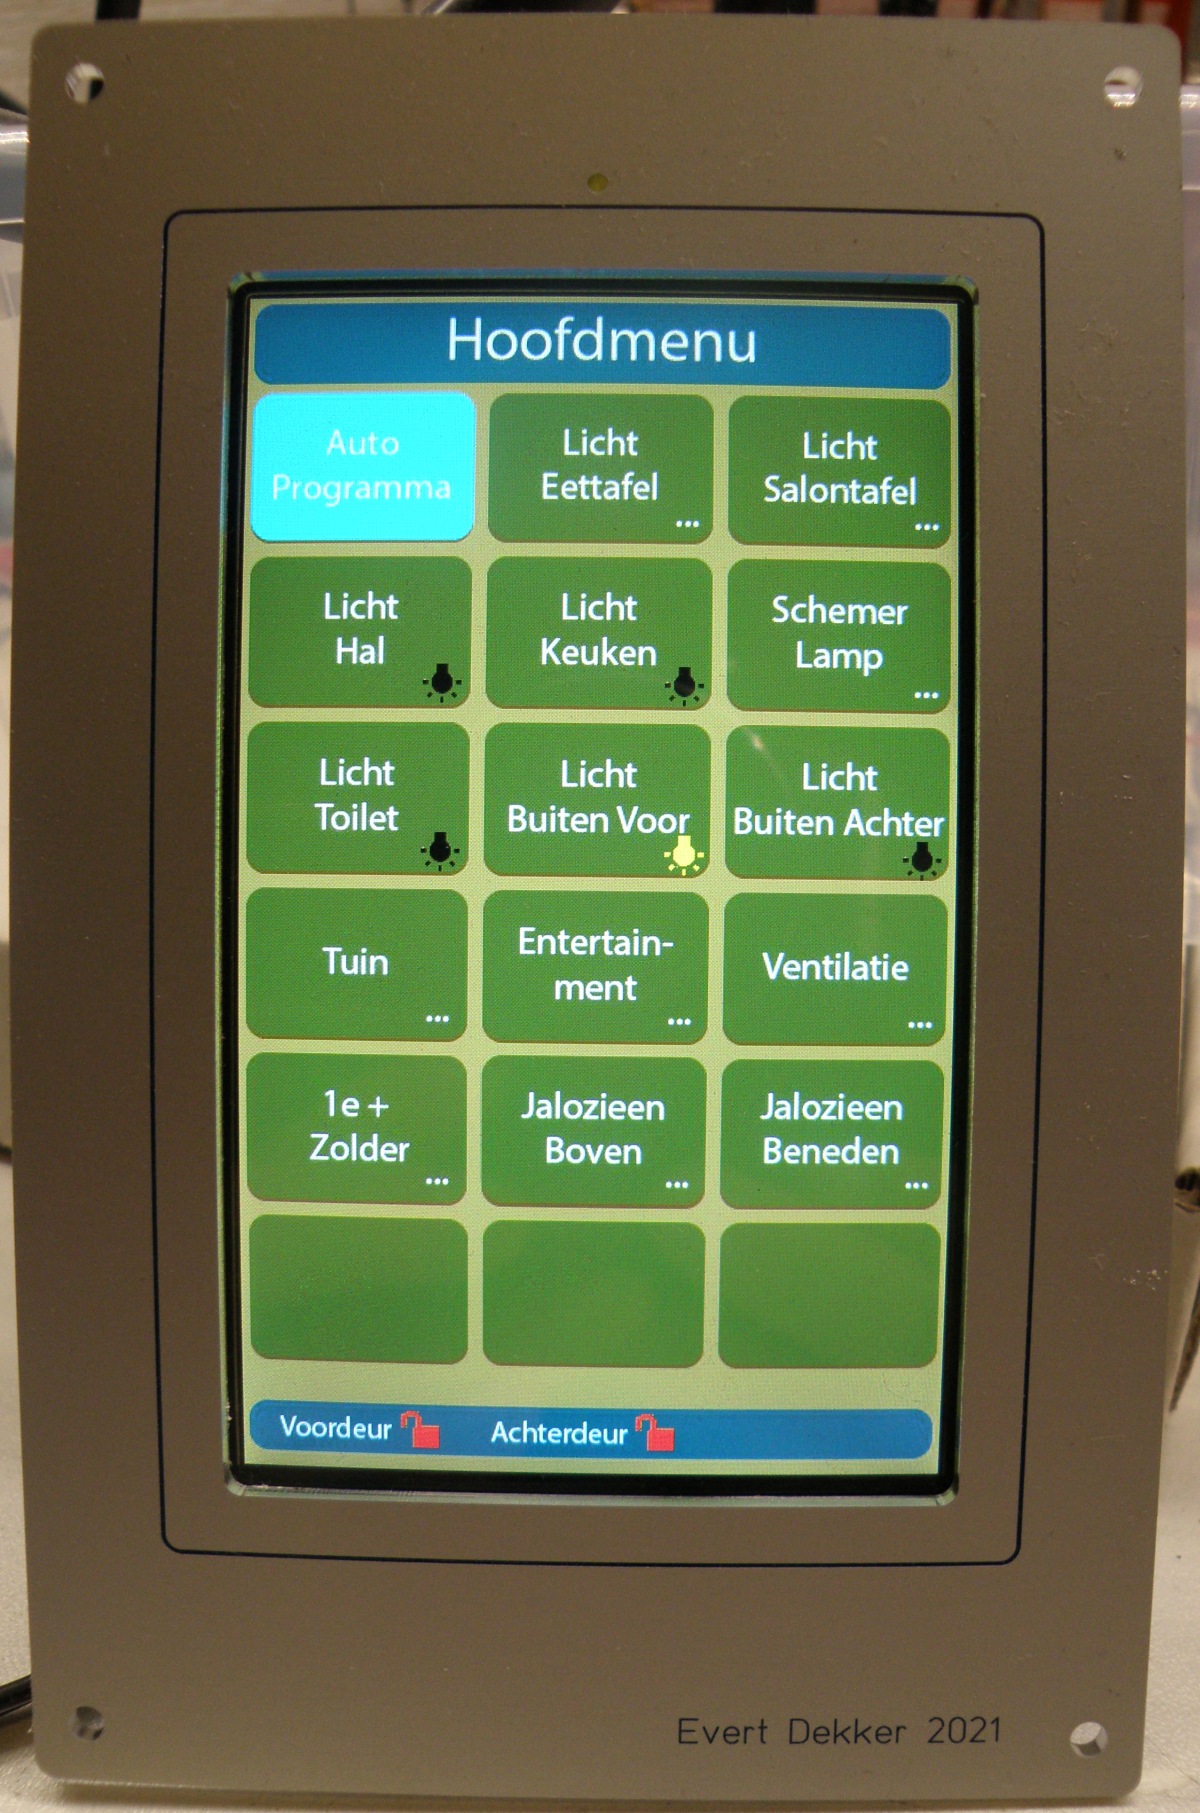
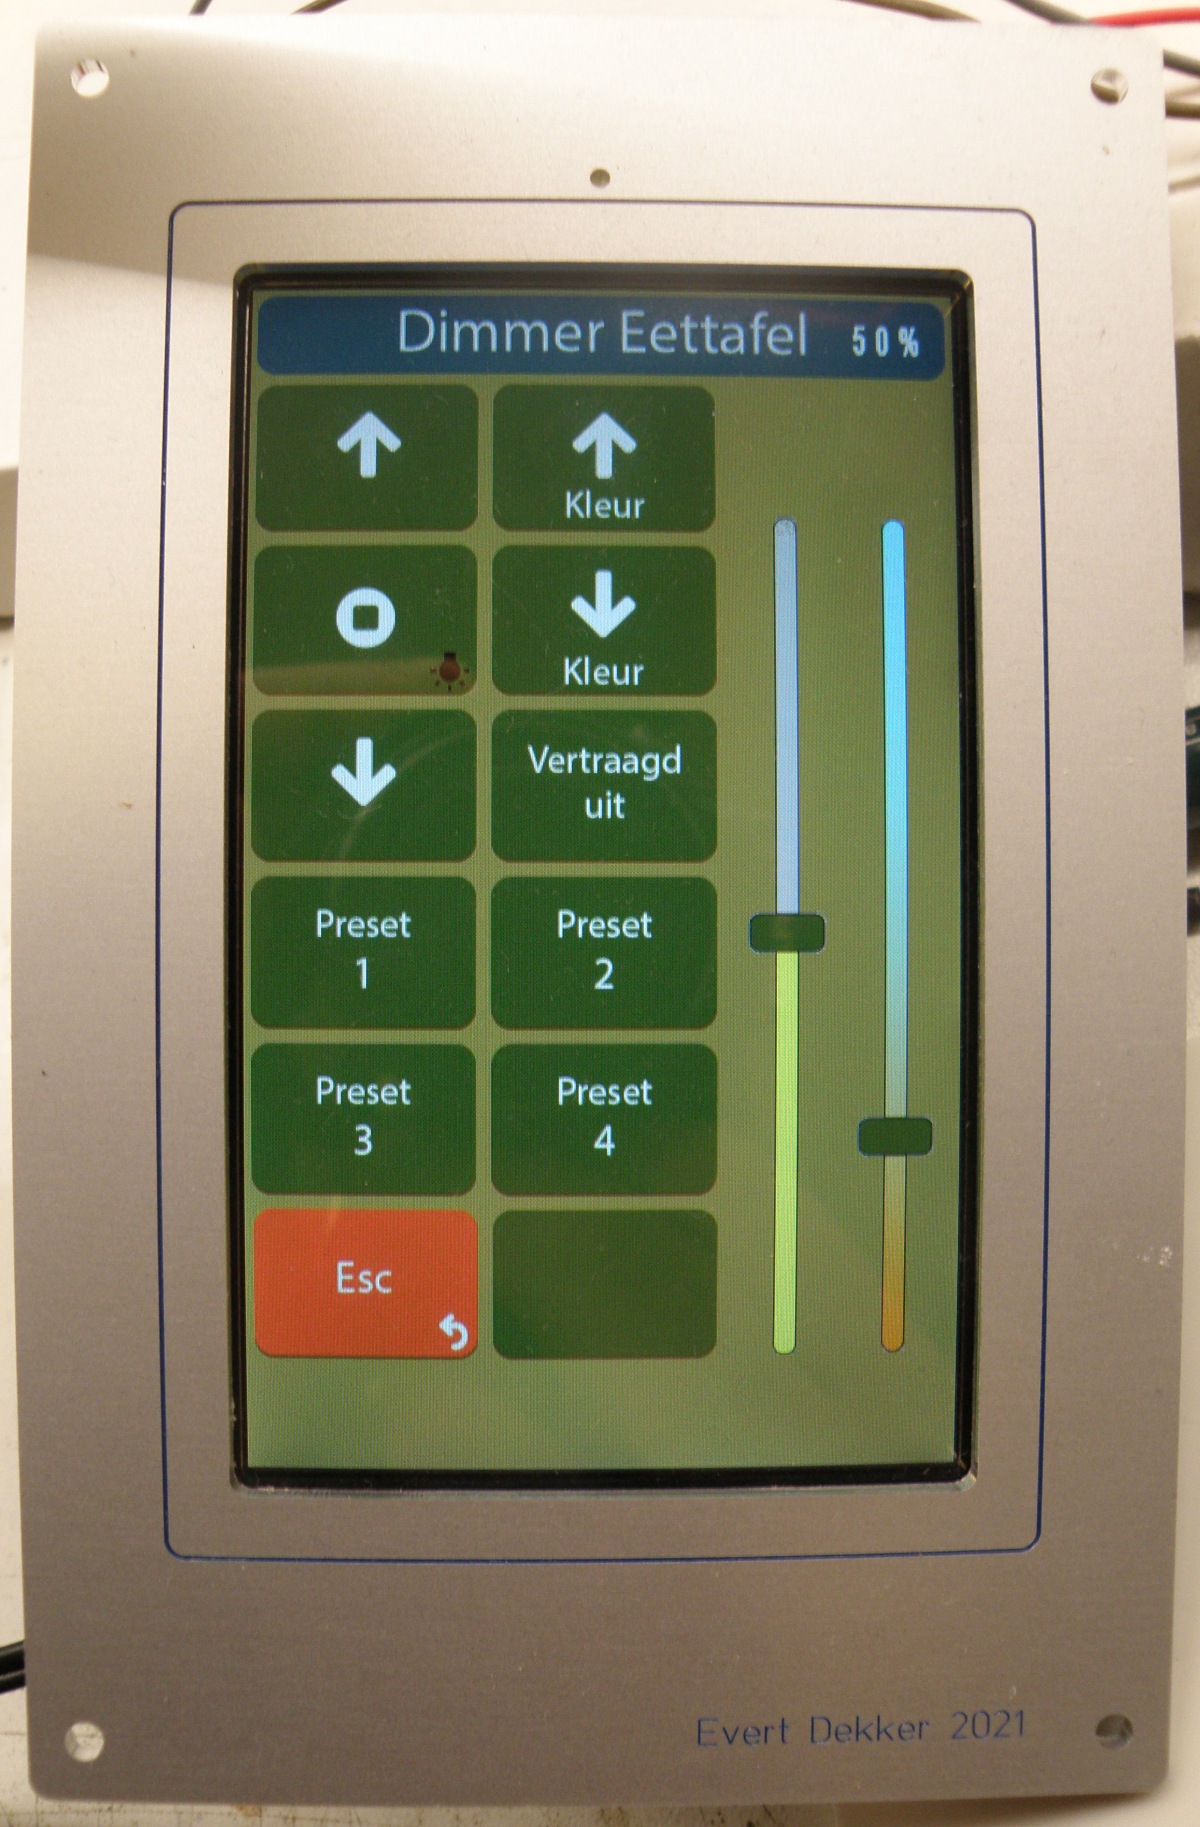
All the display pages where designed with Adobe Illustrator. For every position of the slider (100!) a separate image. It’s possible in the Dgus software to move only the nob in software, this was much easier to do, but I liked that the background of the slider also change in color. Same for the color temperature slider, it will change between blue and orange depending of the kelvin value.

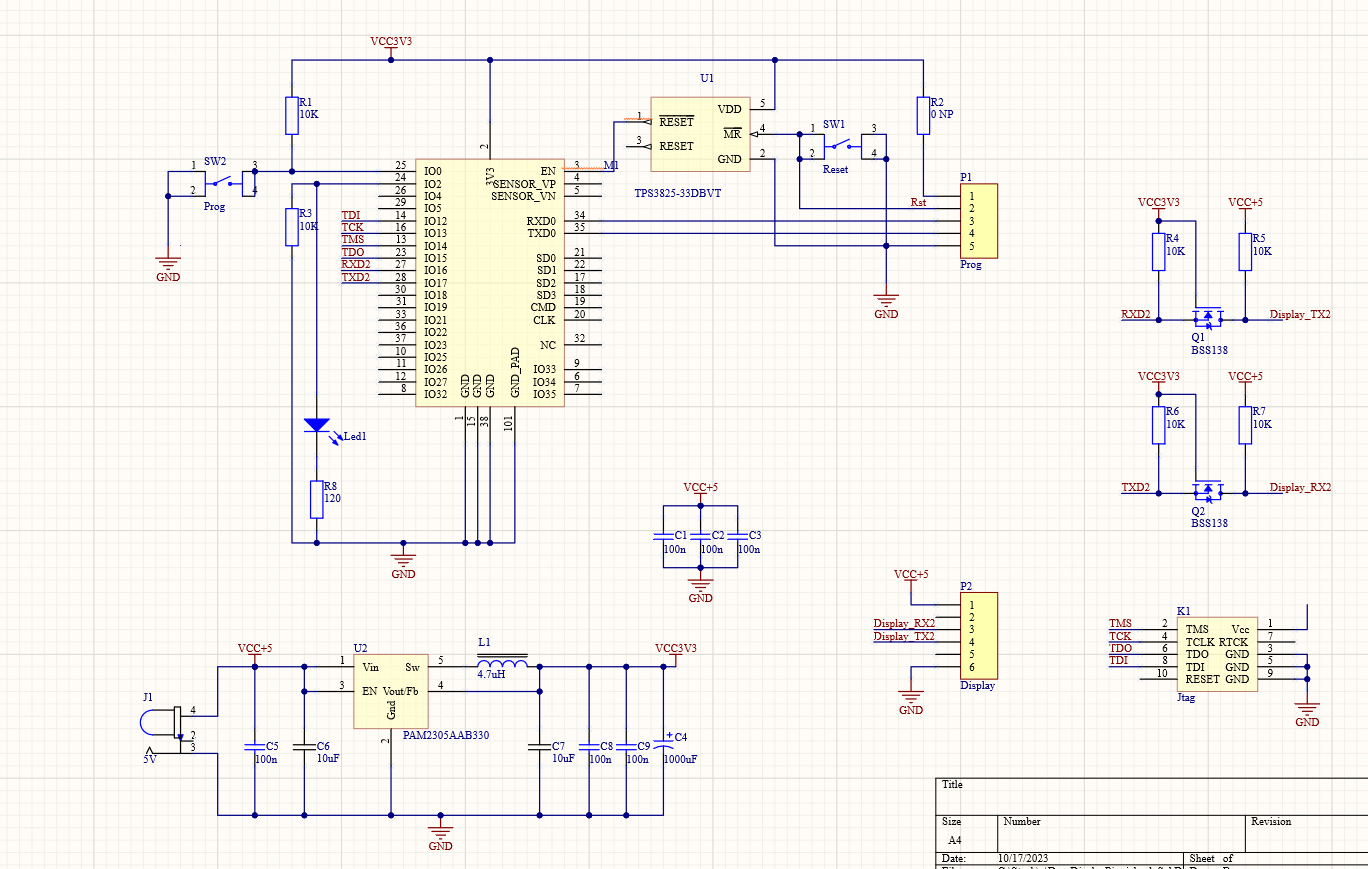
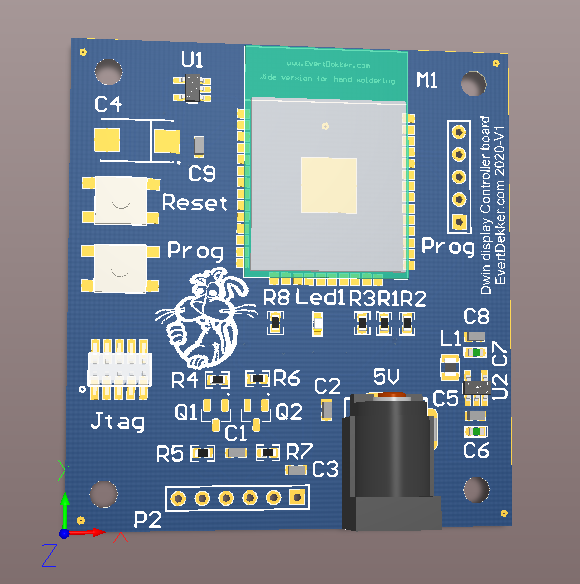
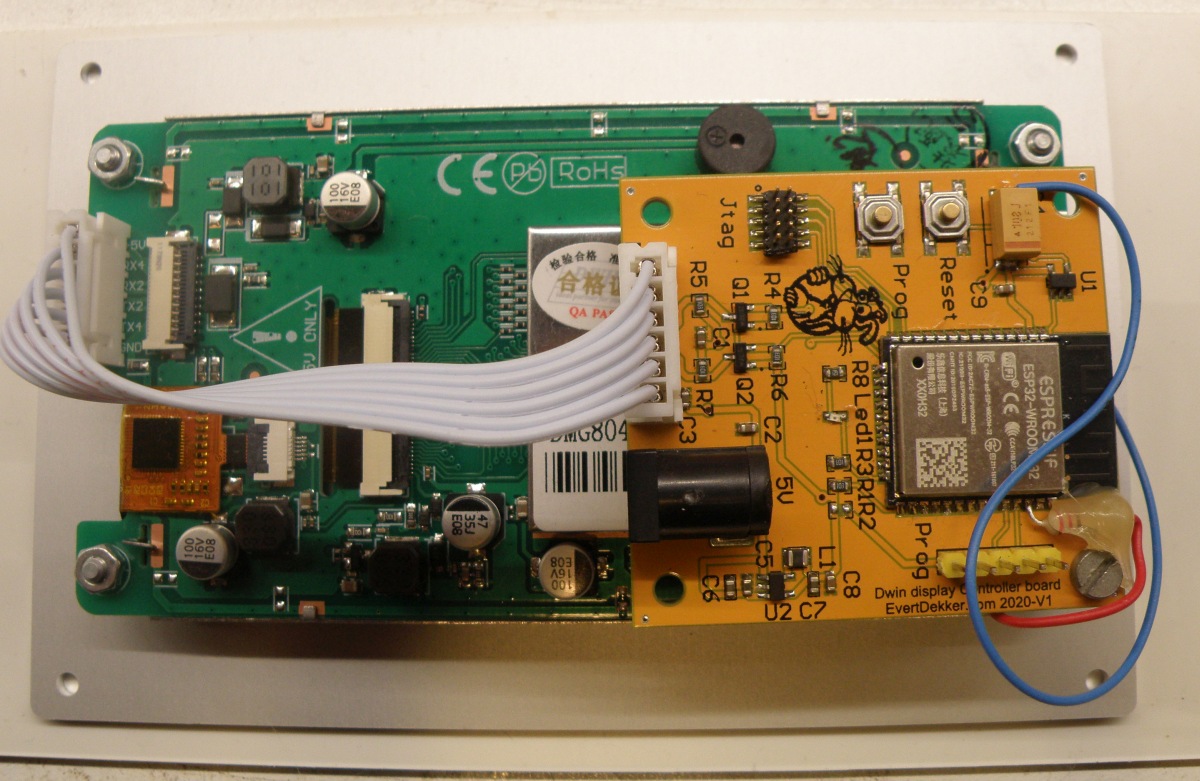
To connect the display to my domotica with the help of wifi and the mqtt broker I designed a piggy back to ( a short off) can be mounted on the back of the display.
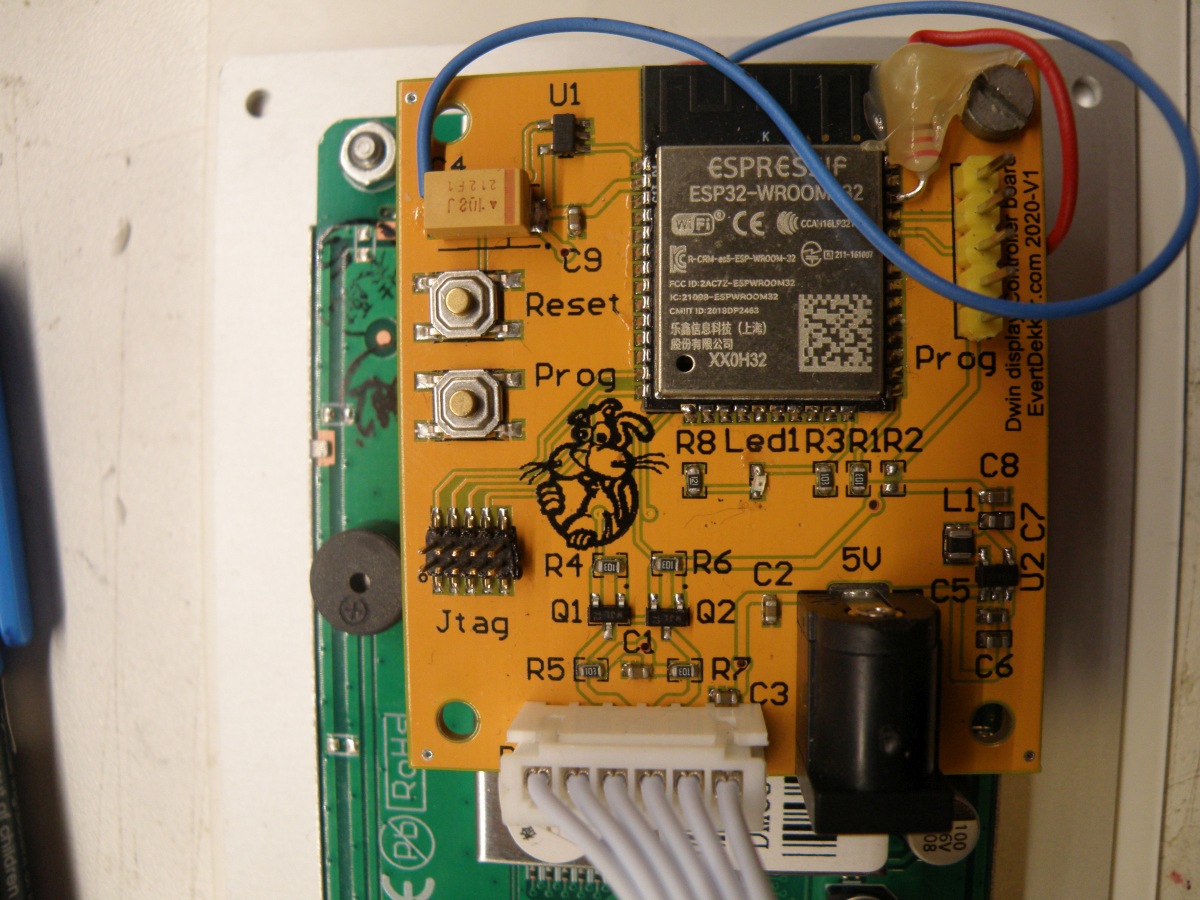
The hart of this module is an ESP32. Not a very special or difficult design. Used an ESP32-vroom with the TPS3825-33DBVT voltage supervisor for stable booting.
The Dwin display works on 5V and this 5V is available on the connector. So the display will supply the 3.3V power to the ESP32 with the help of an PAM2305AAB330 step down regulator. Not that special, used this setup in more of my design’s.
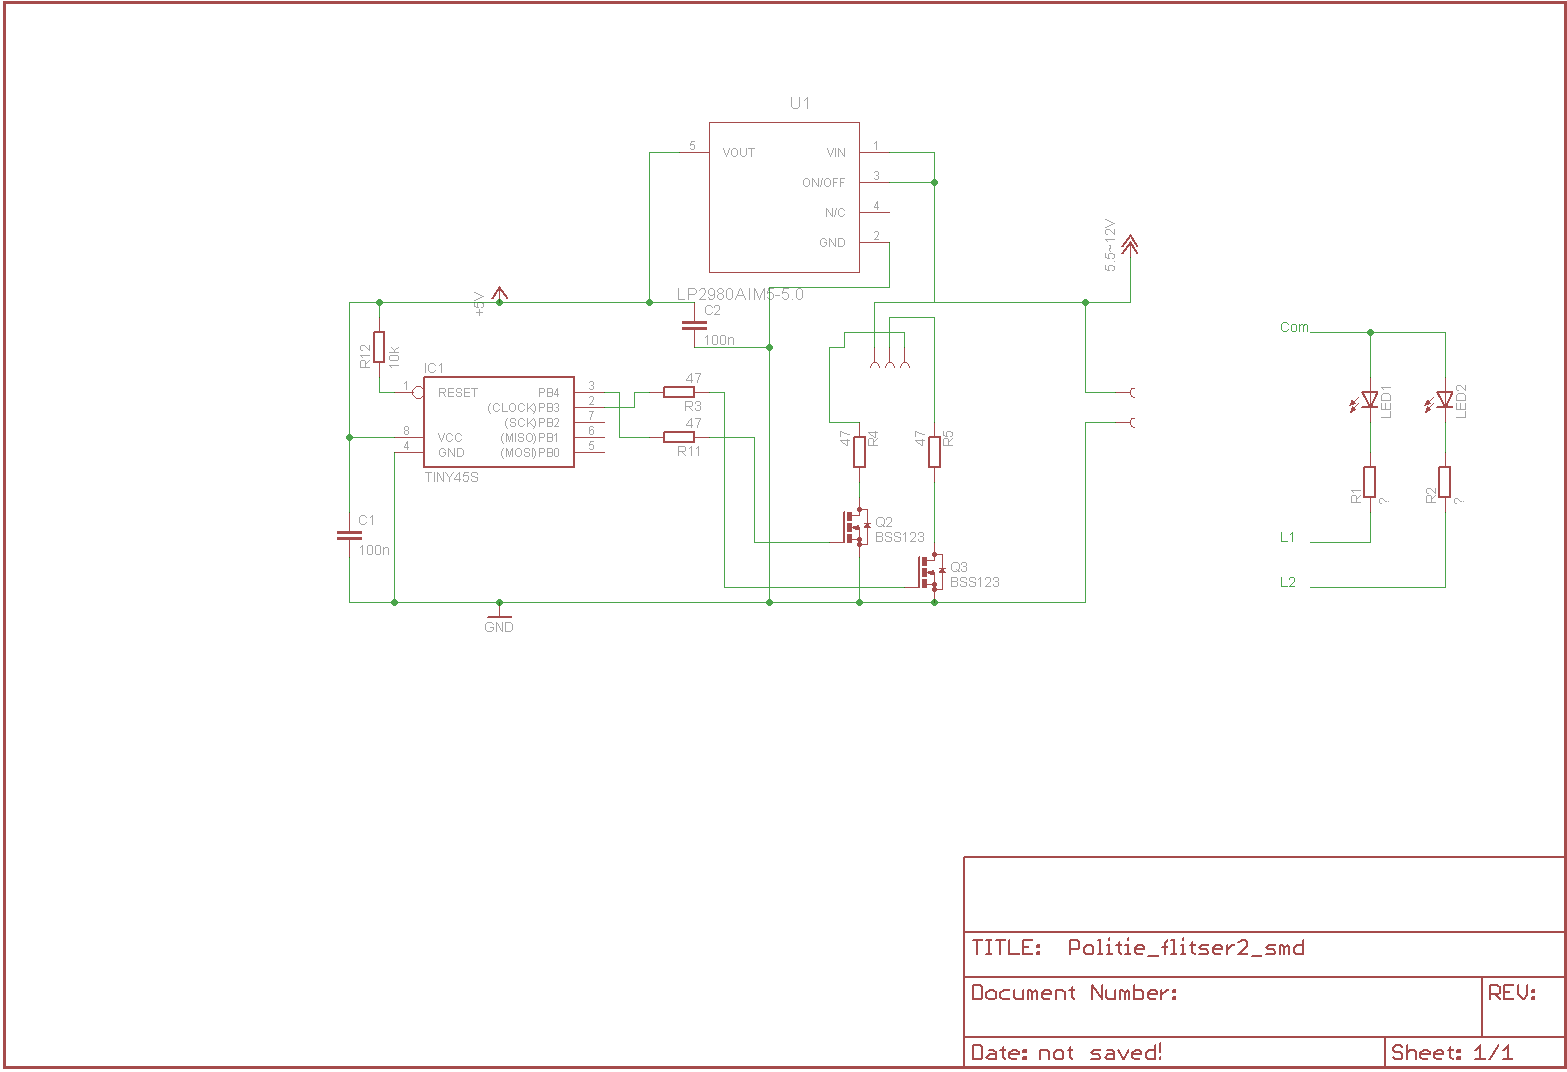
For level conversion for the 2 data lines the choice was made for a simple convertor with mosfet ‘s.

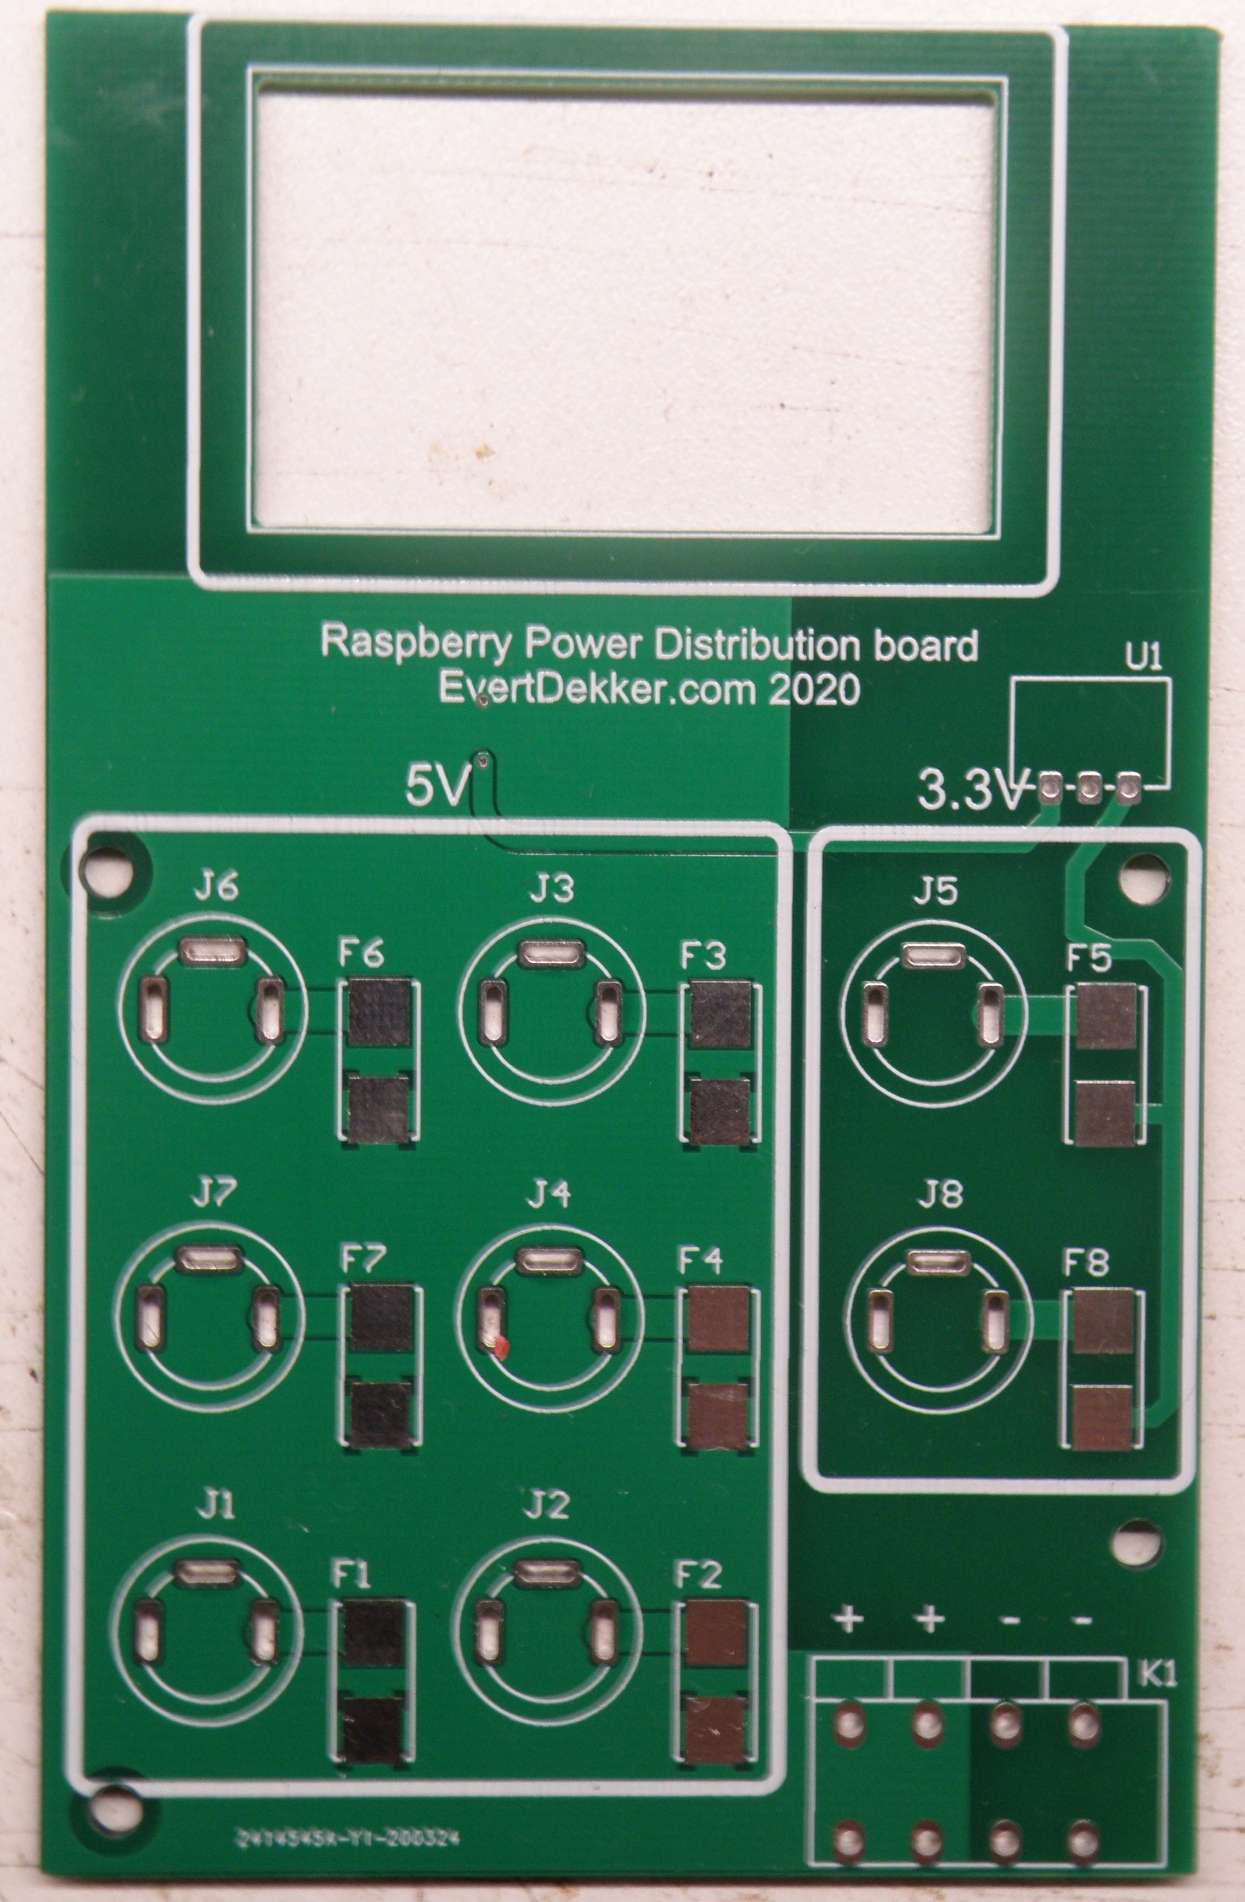
Pcb was designed in Altium 16 and the pcb made by my regular supplier  elecrow.com.

Front panel bezel is made with the free software from Schaeffer Ag and the front panel was also made by Schaeffer Ag. This was the most expensive (€48) part of this project, however it’s the finishing touch that everybody will see.

And at last the firmware for the EPS32 has to be written. This is done in Visual code with the PlatformIO plugin.

All and all it has become a complicated project. You have to have knowledge of at least 5 (complex) software suite to get the job done and a lot of spare time, but it was fun and educational to do.
Have a look at the picture below for the result. The wifi status Led in the front panel is last minute added so there are the wires for soldered to the ESP32.


Schematic
Dwin display controller
Display backside
Finished pcb
Finished pcb detail
Display mounted in bezel
Dimmer menu example
PlayPause
previous arrow
next arrow
 
Schematic
Dwin display controller
Display backside
Finished pcb
Finished pcb detail
Display mounted in bezel
Dimmer menu example
previous arrow
next arrow


Can’t post all files here. If you need something let me know what you are looking for.
Here are the Altium designer file if you want to make your own pcb or use parts of it.

431 Downloads


Port Based MAC Address Filtering on a Zyxel GS1900 Switch


In this post we’ll show how to lock down a port on a Zyxel GS1900 network switch to only allow traffic for specific MAC address. The Zyxel documentation is very lacking when it comes to the port security features so we figured we’d share these details in hopes that others could benefit from the time we put into getting this working. Here at the office we have one of these switches and a recent need arose to ensure that only some owned devices could plug into a port and get on the private network. Thus far the switch has been a great piece of equipment for the price, performs well, and met our minimal needs. I knew that it supported port security such as this but once logged into the web interface the options didn’t make much sense at first. But after a little trial and error I figured it out and we now have a port secured to only allow two specific MAC addresses to connect to it.

For this example we’ll assume that we have the following two devices/MAC addresses that we want to grant access for them to connect to port 8. In our scenario we have one physical device which is running a Virtual Box VM in Bridged Networking mode so the VM access the port just like any other device would. So we specify both the physical MAC and the MAC for the virtual machine’s network card.
72:BE:E0:07:23:95
72:BE:E0:07:23:96

1. First, login to the web administration tool for your switch and navigate to the Configuration section in the left hand navigation as shown here:

2. Next, click on the MAC Table navigation item. Then add your two MAC addresses to the MAC Table as Static MAC entries on port 8. For example:

3. Next, expand the Security tree in the navigation and click on the Port Security navigation item. On the Global tab, select the Enable radio button and click Apply. For example:

4. Next, click on the Port tab on the same page. Check the box next to port 8 and click the Edit button. On the subsequent page, select the Enable radio button and change the Max MAC Entry Number field to 0 and click the Apply button. This is important and the part that would really have been nice to have been better documented by Zyxel. When finished it should look similar to this:

5. You should now be able to plug in either of the devices to port 8 and they can access the network. On the flip side, you should be able to plug in a device with a different MAC address and it not be able to access the network. In our case, both the physical computer and the Virtual Box VM can now access the network.


Source: 07/02/2017 by Brian Carey KISS IT Consulting Pittsburgh’s.

Modeling light module

Very, very compact (13 x 8.8mm on 0.7mm pcb)  light module that can be used in modeling etc…….
The module has output for 2 channels, a build in bec so it can operate from an wide range of power supply and independent supply for the leds.
It has vary preprogrammed light sequence, for now there are 8 programs. Most of them are maybe typical dutch. Watch the video to see them all.
If you are interested in a module or in a module with other sequence mail me.

  1. Flashing light 1
  2. Flashing light 2
  3. Flashing light 3 (dutch police)
  4. Railroad crossing (45x per second)
  5. Railroad crossing (90x per second)
  6. Flipflop 1 sec.
  7. Highway road sign
  8. Airplane navigation light


Schematic
Finished pcb detail
Finished pcb
PlayPause
previous arrow
next arrow
 
Schematic
Finished pcb detail
Finished pcb
previous arrow
next arrow
Raspberry Pi Power distribution board

At the moment I have 4 raspberry pi’s running 24/7 for various tasks. Some of these tasks are Node-red, Pi-hole, Vpn server and 3 music streamers.
All these’s pi’s need power and all those power plugs are occupying the outlets in the hall way closet. To reduce the required outlets I designed this power distribution board.
The second reason for this design is that the pi3 and 4 are trigger happy to give an “under voltage detected”.  This is because there’s an diode in the 5 volt rail that will has some voltage drop over it. Due this voltage drop the under voltage will trigger very vast. Increasing the input voltage to 5.2V will prevent the above.
There are also some 3.3V output’s for future use.

Added a current and voltage display for monitoring and quick trouble shooting in case of a problem, and for the “looks nice” off course.

Under the pcb there’s a 5V 50w power supply from Ali. This supply has a trimmer to adjust the output voltage, so it could be increased to 5.2V.

For the output connectors there where 5.5mm connectors used with screw lock, you don’t want by accident pull out one of the power supply cables. All the outputs have a 3A fuse.
Cables between the power distribution board are home made. To be honest they are half home made. Bought some thick (3A fast charging) usb to usb-micro cables from Ali and cut off the usb connector and mounted the 5.5mm plug.

The pcb’s are ordered from Jlcpcb.com. Good pcb quality, however they messed up the milling for the display, they forgot to subtract half milling diameter to the given dimensions so the hole is a bit to big. Complaining doesn’t help, it’s always the customer his fault. Next pcb I’m going to order my pcb from Elecrow.com again.

Pcb Front
Pcb Back
Up and Running
PlayPause
previous arrow
next arrow
 
Pcb Front
Pcb Back
Up and Running
previous arrow
next arrow

Doublelock Sensor

Sometimes you’re laying in bed and your are almost sure that the front and back door are on the doublelock, you ask your wife did you check the doors and she answers I thought you did that.
From that moment you can’t sleep because your not 100% sure you locked the doors properly with the doublelock. The only thing left is getting out of bed and go downstairs to check the locks, then they are always locked, but if you do not check if they are locked then the door is unlocked for the whole night.

A simple led in the Node-red dashboard on my phone or a physical led in the bedroom to check if the doors are locked and you can go sleep like a princess. Because the status of the doublelock is now known in Node-red you can do everything with it.

The mechanical part of those kind of projects is the biggest challenge. How can you measure reliable if the door is double locked. You can buy locks with a build in sensor, but then you have to adapt your door and/or door frame and bring a thick chequebook.
The lock I have is of the type (Dutch: 3 punts sluiting) 3 point closure lock, see picture. That means that the door is locked on 3 points for maximum security. The top and bottom lock hook is designed so they push the door towards the door frame for a tight closure. Those hooks will hook in a metal lock tray. When those hooks are out and making (electric) contact with the lock tray you are sure that the door is locked and on double lock.
So measuring if there’s an electrical connection between the hook and metal tray will be the best and easiest way to do this.

The idea was to use an of the shelf 433Mhz wireless door/window burglar alarm sensor and replace the reed switch with the “hook” and “tray” contact. Important was that this sensor can detect opening and closure, not all 433Mhz will send an unique code for both events. My choice was the GS-WDS07 sensor that you can find for example on Banggood. It runs on a single AAA battery, and this battery should last for at least 3 years, see below for my findings. The last digit of the code send by the GS-WDS07 will determine what the message is.

13F70A Open
13F70E Closed
13F707 Tamper
13F706 Low battery

As receiver for the 433Mhz signal I’m using a Sonoff RF-bridge with Tasmota software and Portischs firmware for the rf chip inside. With Tasmota it’s very easy to get all the data from the sensors in Mqqt and Node-red.

Installed the wiring and sensor, all works perfect. When the door is double locked the sensor led becomes green and if not locked the sensor becomes red.
However after using the sensors for 7 months, very rare the sensor stops working and you have to remove and reinsert the battery to get the sensor going again. This makes the sensor and the whole idea unreliable, you can’t trust the state of the indicator any more, bummer, still have to go downstairs to check the doors.
Because the sensor only sends data when the state changes, and that can be sometimes ones in 2 days, it’s hard to determine if the sensor is alive. I need something that will give “i’m still alive” message every x time. With this message you can make something simple in Node-red that will notify me when the sensor is off line.

After initial thought like making my own sensor with an ESP8266 or Avr with rf module, I came to the idea to use the unpopulated tamper switch of the GS-WDS07 sensor.
Activating the tamper switch every 15 minutes will send a code that we can use for this purpose.
To get this job done a Tiny45 avr processor with some software was added to the sensor, to save energy the avr had to draw a low current as possible. The Tiny45 draws only 4µA when sleeping with the watchdog timer enabled, adding this to the 36.8µA that the sensor was using, isn’t a big issue.
Internally the sensor runs on 3.3V, so giving the attiny45 some power isn’t also a big problem.
The tamper switch signal pin was internally pull-up to vcc, to activate the tamper signal this has to be grounded. The  Bascom code will wake up every 15 minutes and pull the tamper switch signal to ground for 50ms and goes back to sleep after setting the pin back as input to prevent energy use.

An AAA battery has a capacity around 1500mAH, the sensor can run 1736 days on this. However there will be now a “i’m alive” transmission every 15 minutes.  This transmission takes 1.4Sec and consumes 24mA peak. This is around 40µAH, add this up to the 40µAH the sensor was consuming and you can still run 868 days on 1 AAA battery. That’s fine with me. I love doing low power projects with Avr.

Developed the code in Bascom Avr, on of my favourite compilers that I’m using now for more then 20 years.
Made a little test setup with a dip version of the tiny45 on a breadboard, after writing and testing the code flashed it in a smd tiny45 and soldered that in sensor.

Job, done.

3 Point Closure
Wire connected to come
Come cabletray
Power used sleeping
Power used sending
Door cabletray
Sensor mounted
Modified sensor
programmingmcu
Develop setup
PlayPause
previous arrow
next arrow
 
3 Point Closure
Wire connected to come
Come cabletray
Power used sleeping
Power used sending
Door cabletray
Sensor mounted
Modified sensor
programmingmcu
Develop setup
previous arrow
next arrow

Used Bascom code.

'#####################################################
' Door sensor "is alive" hack
' EvertDekker.com 2020
' V1 20200531 Bascom 2082
' Thanks to EDC for the nice watchdog example
'#####################################################

$PROG &HFF,&H42,&HDF,&HFF' generated fuse bit settings. 
$regfile = "attiny45.dat"
$crystal = 1000000
$hwstack = 64
$swstack = 16
$framesize = 64

Config Portb = Input                                       'to Reduce Power , Setup All Pins As Inputs With No Pullups

Adcsra.aden = 0                                             'Disable a/d convertor
Acsr.acd = 1                                                'Disabel analog comperator
Didr0 = &H3F                                                'Disable digital input buffers on all ADC0-ADC5 pins
Prr.pradc = 1                                               'Power adc disable
Prr.prtim0 = 1                                              'Power timer0 disable
Prr.prtim1 = 1                                              'Power timer1 disable

Const Minutsleep =(15*60)/8.192                            '15 minutes * 60 sec / 8.192

Dim Sleep_cnt As Byte

Config Watchdog = 8192                                      ' ~8s"
Start Watchdog
On Wdt Wdt_isr Nosave
Enable Interrupts


Do

   If Sleep_cnt = 0 Then
      Sleep_cnt = Minutsleep                                 'Set counter back to start value
      Config Portb.3 = Output                               'PortB.3 as output
      portb.3=0                                               'Pull it low to activate the tamper input
      waitms 50
      Config Portb.3 = input                                'PortB.3 back as input to prevent energy use
   Else
      Decr Sleep_cnt
   End If

   Enable Wdt
   Config Powermode = Powerdown                            'Will go to sleep here

  'here uC will start after wake up

Loop

Wdt_isr:
 'dont enable Wdt here
Return