Graphic fonts

We know the Bascom font files from the graphic display with a KS108 controller. These controllers don’t have a build in font set, so Bascom creates the font by software and writes the letters pixel by pixel on the screen. We can create or modifier those fonts with the Font generator that’s build in Bascom. With this we have a limited flexibility .

The displays with a T6963 have build in font generator for the size 6×8 or 8×8. Custom fonts like the Euro sign or Greek letters is not (easy) to implement, larger or smaller fonts are also not possible with the build in fonts.

But now we have a routine that’s using the Bascom font files and can be used with all the graphics display supported by Bascom.

You can create your own font (share it with us please) or use one of the font’s supplied with Bascom.

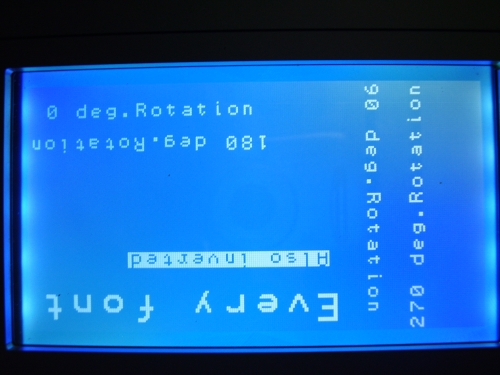
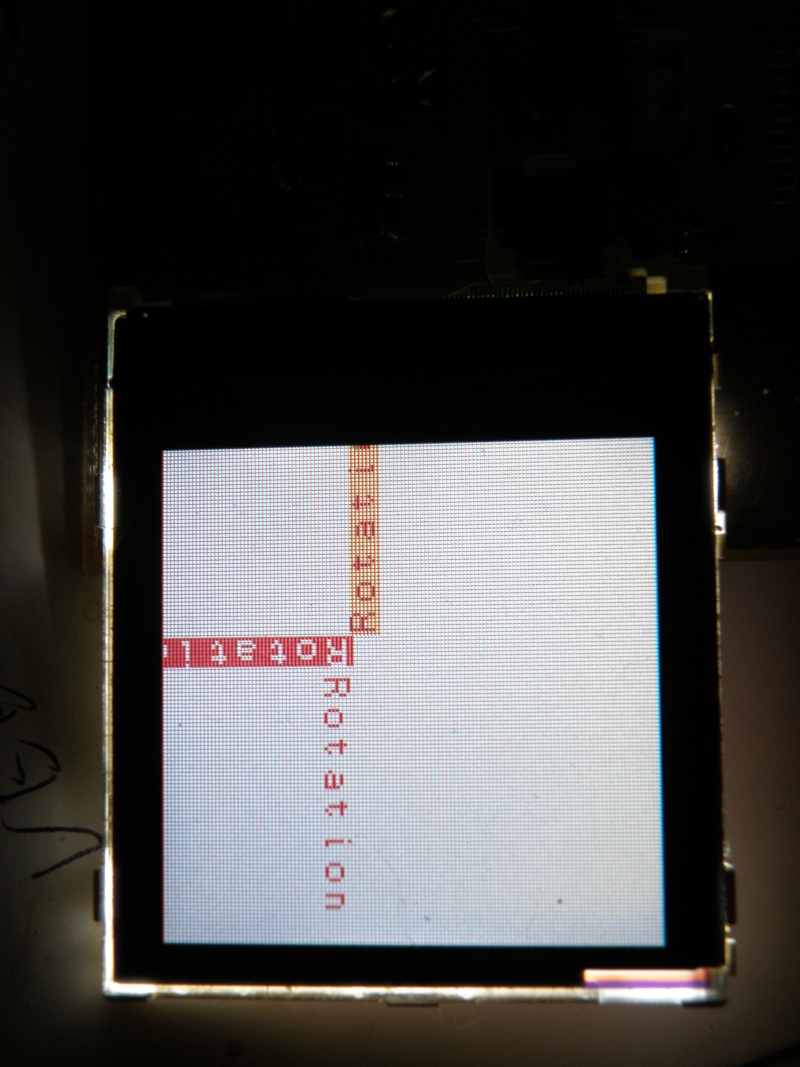
All of the font’s can be inverted and/or rotated in 4 directions.

With the Bascom Locate statement it was not possible to place the text anywhere on the screen. Locate uses an 8×8 matrix to place the text. This routine uses a 1×1 matrix, so you can place the text precise under you graphic image etc.


Syntax

Lcdtext string, x , y , fontset , inverse , rotation

Remarks

 String  String to be displayd
 x  Constant or variable with x position.
 y  Constant or variable with y position.
 fontset  Fontset to be used to display the text
 Inverse  0= Normal 1= Inverted
 Rotation  0= Normal , 1=90 deg. 2=180 deg. 3=240 deg.


To add or remove fontsets modify these lines in the subroutine;

If Fontset = 1 Then Restore Font8x8
If Fontset = 2 Then Restore Font16x16
If Fontset = 3 Then Restore Font6x8
If Fontset = 4 Then Restore Font5x5
Sorry, but there was no better solution.

These are the name’s that you gave to the font, NOT the filename if you don’t know the font name, open the font file in the font editor, and there it is, right on top.

Don’t forget to $Include your font files at the end of the program.


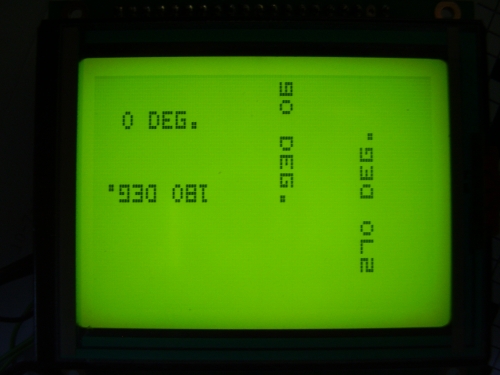
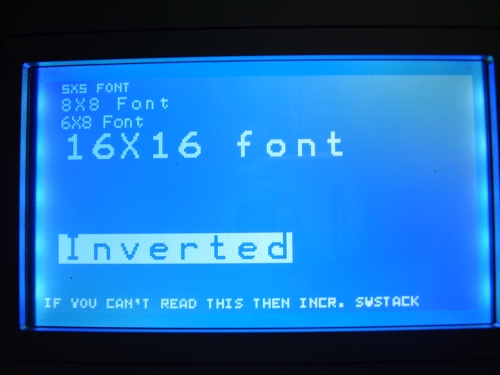
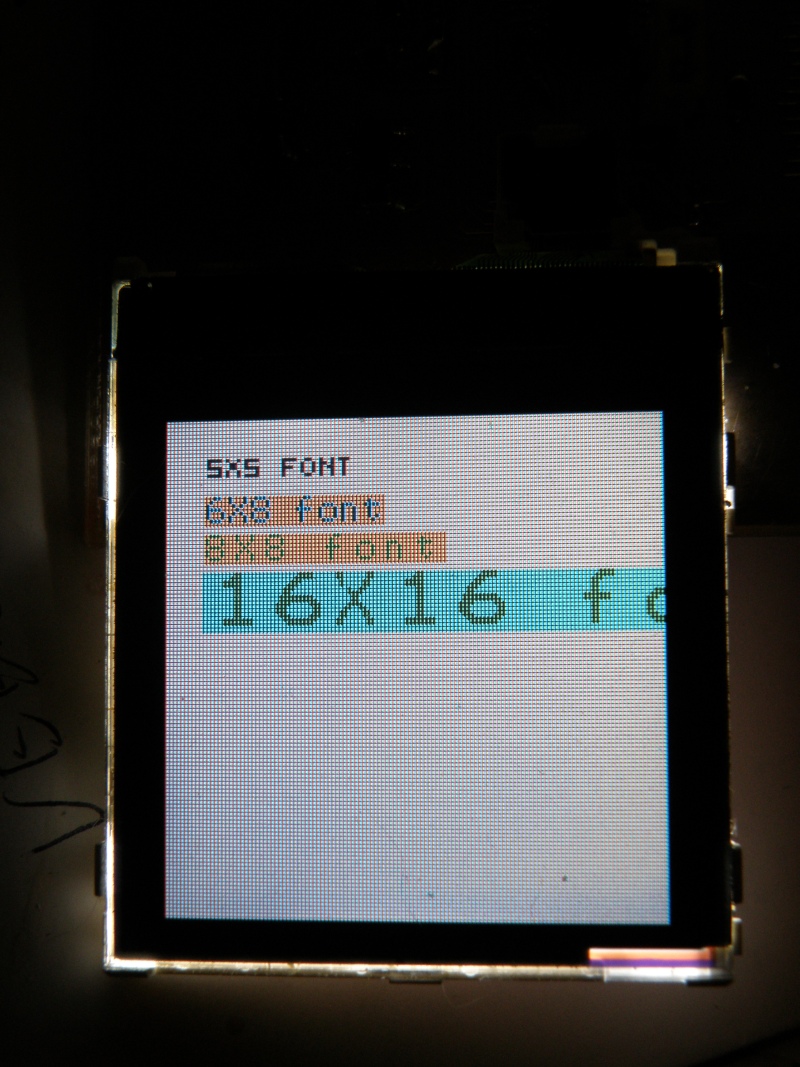
Here are some sample’s created with the demo program.

Ks108
Ks108
T6963c
T6963c
Color display
Color display
PlayPause
previous arrow
next arrow
 
Ks108
Ks108
T6963c
T6963c
Color display
Color display
previous arrow
next arrow


Download it all here

Note : Due a bug in Bascom 1.11.8.8  it’s not possible to use fonts 32×32 or bigger.

Update 1:
Color version is now also available. Designed it for the popular Nokia 6100 displays, but it should work on every colordisplay supported by bascom.

Download the color version

Update 2:
Got mail from Mladen Bruck how lifes in Mostar, Bosnia and Herzegowine.
He optimized the graphicfont code and it should works now 10-15% faster.
Thanks for your contribution Mladen !
Download the optimized version here


'------------------------------------------------------------------
'                           GRAPHIC FONT
'     Use the Bascom font file's for all the graphic display's,
'              include inverted and/or rotated text.
'        By Evert Dekker 2007 GraphicFont@Evertdekker dotje com
'                   Created with Bascom-Avr: 1.11.8.8
'------------------------------------------------------------------

$regfile = "m128def.DAT"
$crystal = 7372800
$baud = 19200
$hwstack = 100
$swstack = 120
$framesize = 100

Config Graphlcd = 240 * 128 , Dataport = Porta , Controlport = Portc , Ce = 3 , Cd = 0 , Wr = 2 , Rd = 1 , Reset = 4 , Fs = 5 , Mode = 6
Cursor Off
Cls


Declare Sub Lcdtext(byval S As String , Byval Xoffset As Byte , Byval Yoffset As Byte , Byval Fontset As Byte , Byval Inverse As Byte , Byval Rotation As Byte)
'SYNTAX  Lcdtest String , Xoffset , Yoffset , Fontset , Inverse , Rotation
'
'* Xoffset and Yoffset is in pixels, so you can place text on every spot on the display
'* You determin yourself in the subroutine witch font belongs to the fontset


'=== Your main prog here ====
Do
Lcdtext "5X5 Font" , 10 , 2 , 4 , 0 , 0
Lcdtext "8X8 Font" , 2 , 120 , 2 , 1 , 3
Lcdtext "6X8 Font" , 10 , 20 , 3 , 0 , 0
Lcdtext "16X16 font" , 10 , 30 , 2 , 0 , 0
Lcdtext "Inverted" , 10 , 85 , 2 , 1 , 0
Lcdtext "If you can't read this then incr. Swstack" , 1 , 120 , 4 , 0 , 0
Wait 10
Cls
Lcdtext "0 deg.Rotation" , 10 , 10 , 1 , 0 , 0
Lcdtext "90 deg.Rotation" , 170 , 1 , 1 , 0 , 1
Lcdtext "180 deg.Rotation" , 120 , 20 , 1 , 0 , 2
Lcdtext "270 deg.Rotation" , 200 , 120 , 1 , 0 , 3
Lcdtext "Also inverted" , 150 , 80 , 1 , 1 , 2
Lcdtext "Every font" , 150 , 100 , 2 , 0 , 2
Wait 10
Cls
Loop
End


'=== Sub Routines ===
Sub Lcdtext(byval S As String , Xoffset As Byte , Yoffset As Byte , Fontset As Byte , Inverse As Byte , Rotation As Byte)
Local Tempstring As String * 1 , Temp As Byte               'Dim local the variables
Local A As Byte , Pixels As Byte , Count As Byte , Carcount As Byte , Lus As Byte
Local Row As Byte , Byteseach As Byte , Blocksize As Byte , Dummy As Byte
Local Colums As Byte , Columcount As Byte , Rowcount As Byte , Stringsize As Byte
Local Xpos As Byte , Ypos As Byte , Pixel As Byte , Pixelcount As Byte
If Inverse > 1 Then Inverse = 0                             'Inverse can't be greater then 1
If Rotation > 3 Then Rotation = 0                           'There are only 4 rotation's
Stringsize = Len(s) - 1                                     'Size of the text string -1 because we must start with 0
For Carcount = 0 To Stringsize                              'Loop for the numbers of caracters that must be displayed

 If Fontset = 1 Then Restore Font8x8                        'Add or remove here fontset's that you need or not,
 If Fontset = 2 Then Restore Font16x16                      'this is the name that you gave to the font, NOT the filename
 If Fontset = 3 Then Restore Font6x8                        'If you dont know the name, open the font file in wordpad, and there it is,
 If Fontset = 4 Then Restore Font5x5                        'right on top.

 Temp = Carcount + 1                                        'Cut the text string in seperate caracters
Tempstring = Mid(s , Temp , 1)
Read Row : Read Byteseach : Read Blocksize : Read Dummy     'Read the first 4 bytes from the font file
Temp = Asc(tempstring) - 32                                 'Font files start with caracter 32
For Lus = 1 To Temp                                         'Do dummie read to point to the correct line in the fontfile
   For Count = 1 To Blocksize
    Read Pixels
   Next Count
Next Lus
Colums = Blocksize / Row                                    'Calculate the numbers of colums
Row = Row * 8                                               'Row is always 8 pixels high = 1 byte, so working with row in steps of 8.
Row = Row - 1                                               'Want to start with row=0 instead of 1
Colums = Colums - 1                                         'Same for the colums
Select Case Rotation
    Case 0                                                  '0 degrees rotation
            For Rowcount = 0 To Row Step 8                  'Loop for numbers of rows
                  A = Rowcount + Yoffset
                  For Columcount = 0 To Colums              'Loop for numbers of Colums
                      Read Pixels : If Inverse = 1 Then Toggle Pixels       'Read the byte from the file and if inverse = true then invert de byte
                      Xpos = Columcount                     'Do some calculation to get the caracter on the correct Xposition
                      Temp = Carcount * Byteseach
                      Xpos = Xpos + Temp
                      Xpos = Xpos + Xoffset
                          For Pixelcount = 0 To 7           'Loop for 8 pixels to be set or not
                             Ypos = A + Pixelcount          'Each pixel on his own spot
                             Pixel = Pixels.0               'Set the pixel (or not)
                             Pset Xpos , Ypos , Pixel       'Finaly we can set the pixel
                             Shift Pixels , Right           'Shift the byte 1 bit to the right so the next pixel comes availible
                          Next Pixel
                  Next Columcount
            Next Rowcount
    Case 1                                                  '90 degrees rotation
            For Rowcount = Row To 0 Step -8                 'Loop is now counting down
                  A = Rowcount + Xoffset
                  A = A - 15                                'Correction to set Xpos on Xoffset with rotation
                  For Columcount = 0 To Colums
                      Read Pixels : If Inverse = 1 Then Toggle Pixels
                      Xpos = Columcount
                      Temp = Carcount * Byteseach
                      Xpos = Xpos + Temp
                      Xpos = Xpos + Yoffset                 'We want that Xoffset is still Xoffset, so we need here the change from x to y
                             For Pixelcount = 7 To 0 Step -1
                                Ypos = A + Pixelcount
                                Pixel = Pixels.0
                                Pset Ypos , Xpos , Pixel
                                Shift Pixels , Right
                             Next Pixel
                  Next Columcount
            Next Rowcount
    Case 2                                                  '180 degrees rotation
            For Rowcount = Row To 0 Step -8
                  A = Rowcount + Yoffset
                  A = A - 7                                 'Correction to set Xpos on Xoffset with rotation
                  For Columcount = Colums To 0 Step -1
                      Read Pixels : If Inverse = 1 Then Toggle Pixels
                      Xpos = Columcount
                      Temp = Carcount * Byteseach
                      Xpos = Xpos - Temp
                      Xpos = Xpos - 8                       'Correction to set Xpos on Xoffset with rotation
                      Xpos = Xpos + Xoffset
                          For Pixelcount = 7 To 0 Step -1
                             Ypos = A + Pixelcount
                             Pixel = Pixels.0
                             Pset Xpos , Ypos , Pixel
                             Shift Pixels , Right
                          Next Pixel
                  Next Columcount
            Next Rowcount
    Case 3                                                  '270 degrees rotation
            For Rowcount = 0 To Row Step 8
                  A = Rowcount + Xoffset
                    For Columcount = Colums To 0 Step -1
                      Read Pixels : If Inverse = 1 Then Toggle Pixels
                      Xpos = Columcount
                      Temp = Carcount * Byteseach
                      Xpos = Xpos - Temp
                      Xpos = Xpos - 8                       'Correction to set Xpos on Xoffset with rotation
                      Xpos = Xpos + Yoffset
                             For Pixelcount = 0 To 7
                                Ypos = A + Pixelcount
                                Pixel = Pixels.0
                                Pset Ypos , Xpos , Pixel
                                Shift Pixels , Right
                             Next Pixel
                  Next Columcount
            Next Rowcount
End Select
Next Carcount
End Sub                                                     'End of this amazing subroutine


'=== Includes ===
$include "Font8x8.font"                       'Includes here your font files
$include "Font16x16.font"                     'If you don't need the files in your program, don't include them,
$include "Font6x8.font"                       'these are flash memory eaters.
$include "Font5x5.font"
Mp3 player

This is my Mp3 player software that will give me music pleasure in various rooms in the house. The software has written for a touchscreen use. There was no software available for private use that supports touchscreens, Winamp etc. have to small buttons for touch use therefore I decided to make my own.
At this moment there are 1845 albums with 24000 tracks stored on a Windows 2000Server with 1286 covers. All this data is stored on a mirrored 244GB disc.

In the living room the 12″ touchscreen is build in a drawer of the table.


This is the main screen of the Mp3 player.

In the top is the information about the artist, track, play time, bitrate etc. Under the information window is a 2 channel spectrum analyzer. Beneath that on the left is the track slider to scroll trough the current playing number. Here are also the well known play, pause, stop, next track and previous track button’s.
Beneath that is the album and track information. On the right side we have a 12 channel equalizer and below that there are various functions; PRESET + – are used for preprogrammed equalizer settings. With EQ.TYPE you can choose between different spectrum analyzers layouts. Below in the picture with the cover you can see a other layout. The button PEAK is also for the spectrum analyzer so is will show the peaks. With the VIEW button we can switch between the view window for the mp3player or the juxebox, more later. LOUD is used to switch on/off the loudness. The SAVE button is used to save the current equalizer setting in the database. When you play the song again the equalizer will be set as saved. With the SAVE ALL button the equalizer setting will be saved for all the tracks from the album. INTRO will play only the first 15 sec. of a number. REPEAT will repeat the current playing album and AUTO will play the next album when the current album is finished.DISPLAY OFF will switch the spectrum analyzer off.
In the lower right corner there are the album search buttons, you can search with artist, album or category.


The touch keyboard to search for artist, album etc is also designed for touch use.


Here we see the various equalizer functions, here is chosen for a preset called headphone. Because the equalizer setting is changed now it’s possible to save the settings for the track or to whole album, this is indicated by the red leds on the buttons.
If you touch the spectrum analyzer on one of the frequency bars there occurs the frequency and amplitude of the bar. For this example 7,5KHz as an output of 0,33V.


By pressing the VIEW button you can see the tracks that are stored in the Juxebox, and by pressing the JUKE button the tracks in the juxebox are played. Is the track played then it’s removed from the juxebox playlist. Adding tracks to the juxebox is possible when navigating trough the albums by pressing the NAAR JUK button.


When the green led is burning in the COVER button, then there is a cover available to view. Just press the button and the cover will appear in the left window. On the right of the cover appears some extra buttons for the back, cd and inlay cover if available. If you cant see the cover very well you can press on it and a larger version will appear.
Love the Iron Maiden covers.

Joshua bus service tool

To test,update and change the settings of the modules in my Joshua bus I have made a service tool in VB6.
With this tool it’s possible to test all the commands (topleft datagrid),change the settings in the eeprom of the module (bottomleft datagrid) or update the software of the module with a bootloader.
On the left side we have on top the communication window to monitor the Joshua bus data trafic.Below that there are some buttons for communication etc. Below that there is the command datagrid, here are all the commands that this module accepts.  And in the lower left corner we have the settings that are stored in the internal eeprom of the module.
In the upper right corner there are some settings for this program and below that is the datagrid with all the modules that are in use.
By clicking in the command datagrid on the line 199 bootloader the module wil go´s in the bootlader mode en the software will startup the bootloader loader. After 2 sec. the hex file for the module will be downloaded and ready is the update.
The bootloader is not written by me, but with some register hacks completely integrated in the service tool.

Joshua service and controle tool
Joshua Rs485 programmer
PlayPause
previous arrow
next arrow
 
Joshua service and controle tool
Joshua Rs485 programmer
previous arrow
next arrow


Tube amplifier


In 1991 I have build this Tube amplifier and now 16 years later a upgrade was neccessary. It’s not my design but from Radio Bulletin magazine October 1987 by Ir.Menno van der Veen.
The top plate was made from steel with a transparent coating on it, but there where some rust spots on it, so i decided to replace it with an aluminium plate. Made the design with Frontpanel designer from Schaeffer .


tube_amp_3
tube_amp_4
tube_amp_2
tube_amp_1
PlayPause
previous arrow
next arrow
 
tube_amp_3
tube_amp_4
tube_amp_2
tube_amp_1
previous arrow
next arrow


Here are some specs:
Tubes: ECC81, ECC82, 4x EL34  (Each channel)
Transformers: Powersupply Amplimo toroidal 7B649, Output Amplimo toroidal XC462
Frequency range: 5HZ to 125kHz (-3dB, ref.1W @8Ω
Continuos output: 121W (1kHz @8Ω)
Burst output: 156W
THD: 0,78% (1kHz @100W @ 8Ω)
Slewrate: 14,2V/μs (ref.50W @80kHz sinus)
Class A: < 16W @8Ω
Class AB: 16 to 100W @8Ω
Input: 0dBm (0,775V rms) ref.100W @8Ω

Various software

In the past I wrote a lot of software, all custom made for friends, work and on demand. Some application’s are not used anymore, other are still in use.
The first is called “Fastfood delivery” and is written for a customer of my that had a Pizzaria/shoarma restaurant and needed a application for the delivery. Some highlights;
Connection with a modem possible so that with Caller id the customers information appears automatic, Customers history with orders and grandtotal. Orders are stored also for every delivery boy to check the cashflow.


For my work I made a tool called “Euroconvertor” to convert in databases from Vectron Commander 5 all guilder prices and sales in Euro’s.


Also for my work I made “Invullijst”. With this application our customers could fill in how the ecr must be programmed and programmed then the ecr ,did saved a lot time.


For private use I have made my own Mp3player. This is the 1 revision, for the 2e revision see this .


For an girlfriend of my I wrote “Escort service”, yep for the escort business.
The program exist of an customer and employee database. The customer database is a regular dbase with customer information, there are some special fields implanted like, Credit-card, location for the meeting and customer history.
The employee database has special fields with characterize of the employee so you know or look up what you want to sell.
When a employee is on standby her(his) name will appear in the status window. If a customer has chosen a employee you can connect them both together and this will also appears in the status window. Now you know exact when and where your employee is for security reasons.


For my previous boss I wrote a crm program including , stock control, invoices,  summon etc.