How to replace Xbox360 Benq lens

Required tools: Philips screwdriver 00 & 0 ,flat 1 and soldering iron.

The Benq VAD6038 drive is used in some xbox360 units. The quality of this drive various very much due the lens unit. Some unit last forever, other break down within a month. If you have warranty bring it back to M$. Are there reasons that you can’t bring it back, we have here a Diy tutorial for you. New lens units are wide spread available on the net and will cost you between €20,- and €30,-.

The laser or also called lens is a very sensitive device for mechanical stress and static charge. Don’t use force and keep yourself discharged with a wristband. Don’t touch the optical lens with your fingers.
It’s not a difficult job, but if you don’t have experience in repairing fine mechanical component don’t do it and never blame me if you mess it up.
Opening the Xbox360 and removing the drive are not explained here, there are enough tutorials available on the net.

Lets get started
The tray must be open to get access to the lens, you can choose to open the tray by pushing the tray open button when your xbox is still in 1 piece or you can open later the tray by hand.

Step 1 Step 2 Step 3

First remove the 4 screws at the bottom (step 1) of the drive and cut the warranty seal . Now you can take the drive apart by removing the top and bottom metal case.
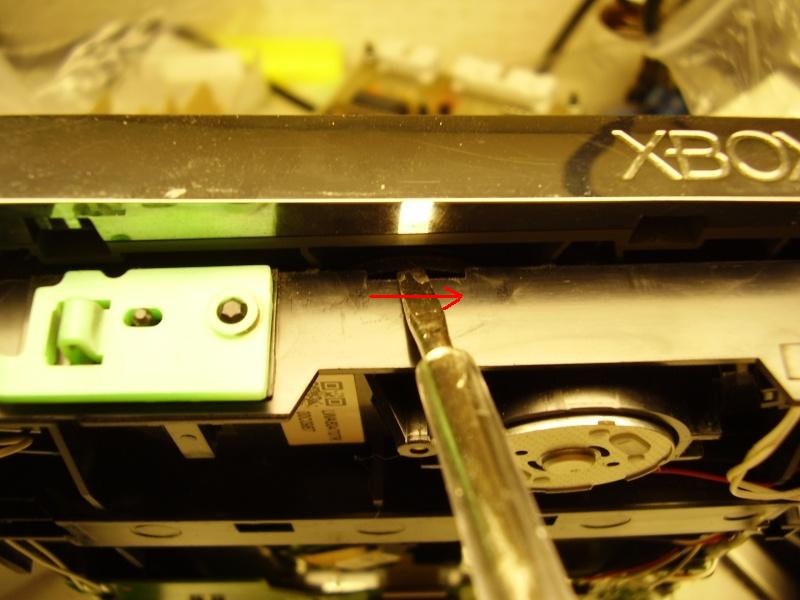
If you didn’t open the tray before then it’s time to do that now. On the front of the drive is just below the tray a small rubber wheel. It’s difficult to see on the picture (step 2) but you will see it. Turn the wheel gently to the right, the laser unit will be lowered and the tray will open slowly. If the tray is about 2cm open you can pull gently on the tray to fasten the opening process.
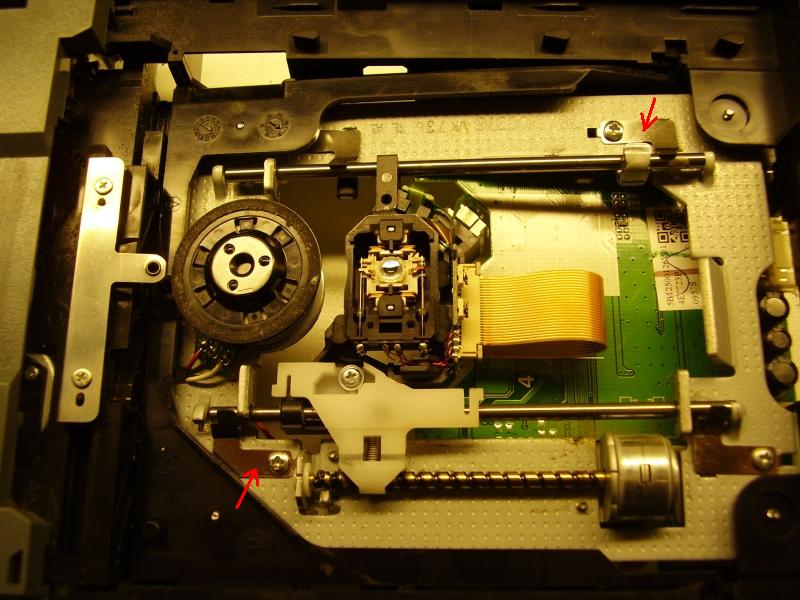
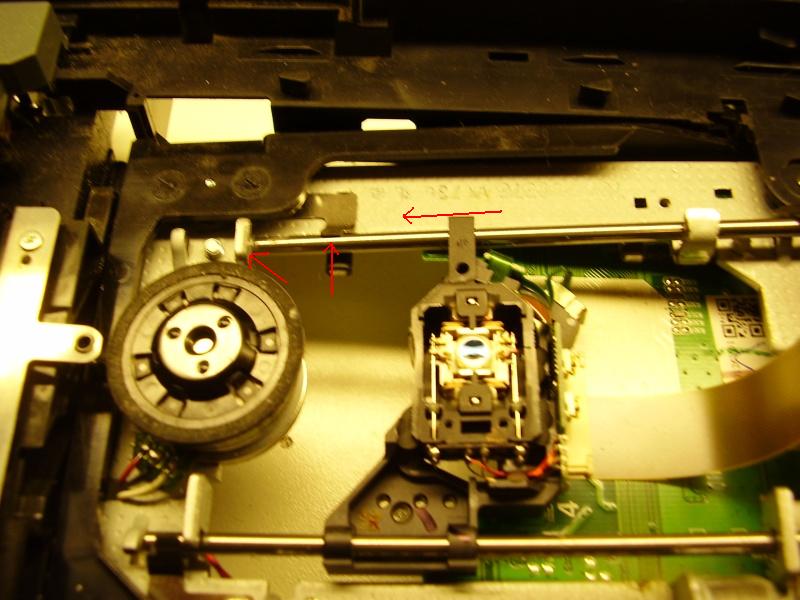
There it is, the lens that gives you all that problems(step 3).
To keep the rest of this tutorial clear put your drive just like I did, with the tray to the left.
Remove now the 2 clamps as marked in step 3, one in the upper right corner and the other in the lower left corner.

Step 4 Step 5 Step 6

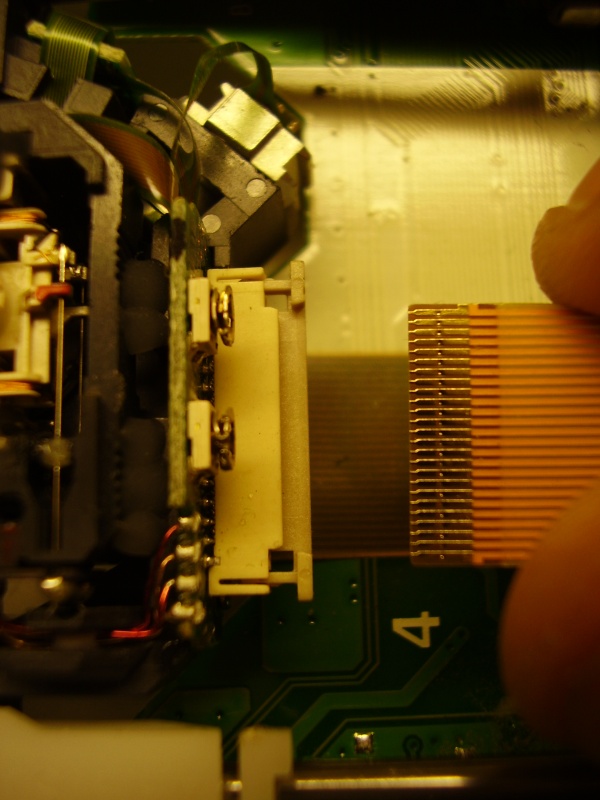
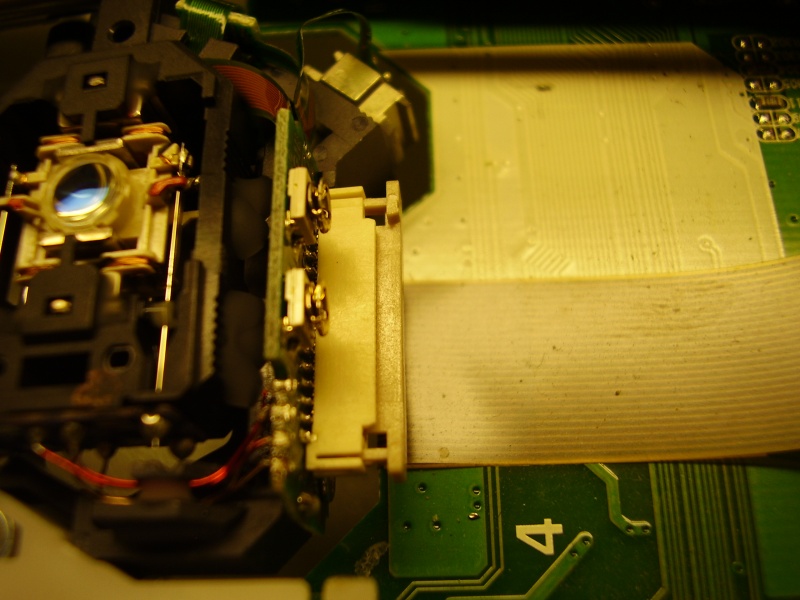
Disconnect now the flat cable from the lens unit (keep yourself discharged !) by gently push the lock (step 4) to the right with a small screwdriver. Repeat this for the other lock, the flat cable will now come very easy lose (step 5).
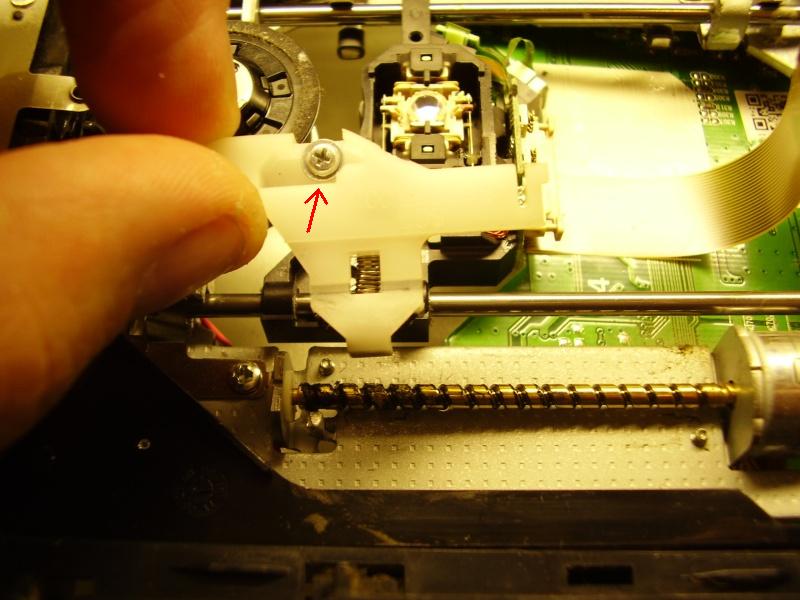
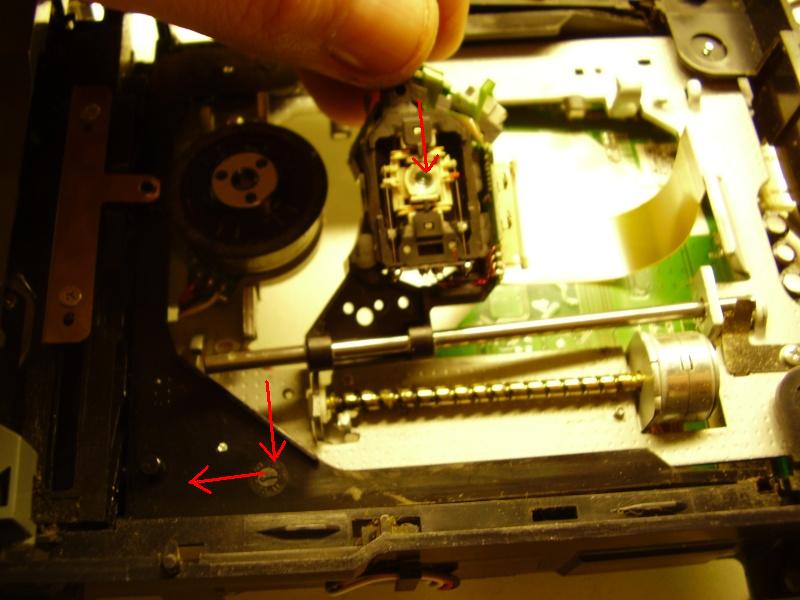
Let’s remove now the driving unit by losing the screw and lifting it(step 6). Watch out that the spring will not jump away.

Step 7 Step 8 Step 9

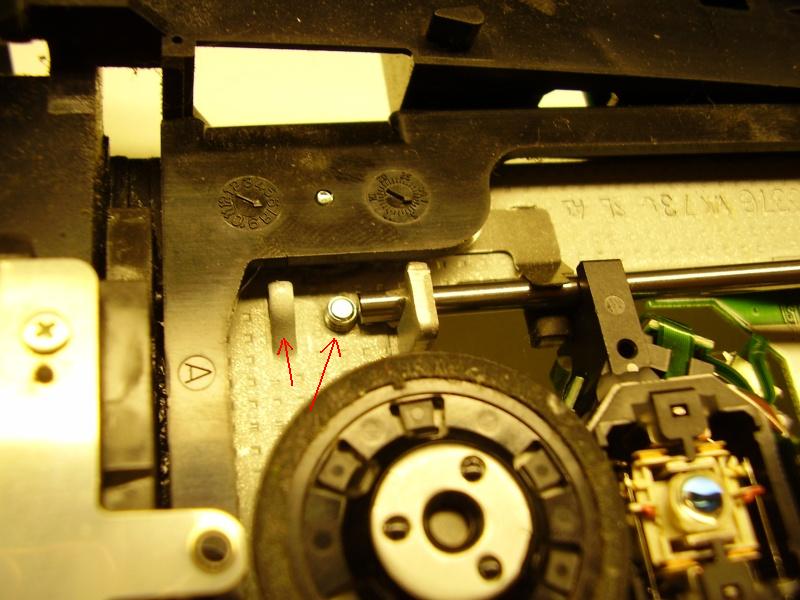
Now we can remove the slide axles and the lens unit. First we must remove the back axle by lifting it up at the right side and push it 5mm to the north and then slide out the axle to the east(step 7). The clamp is the upper left corner (step 8) is still pressing on the axle so you feel a little bit resistance.
The lens unit can now easy be removed by lifting it in a 45 deg angle. Lift now the front axle up on the left side and pull the axle with the lens unit out to the west.

Disassembling is now finished, let’s put it back together.

Step 10 Step 11 Step 12

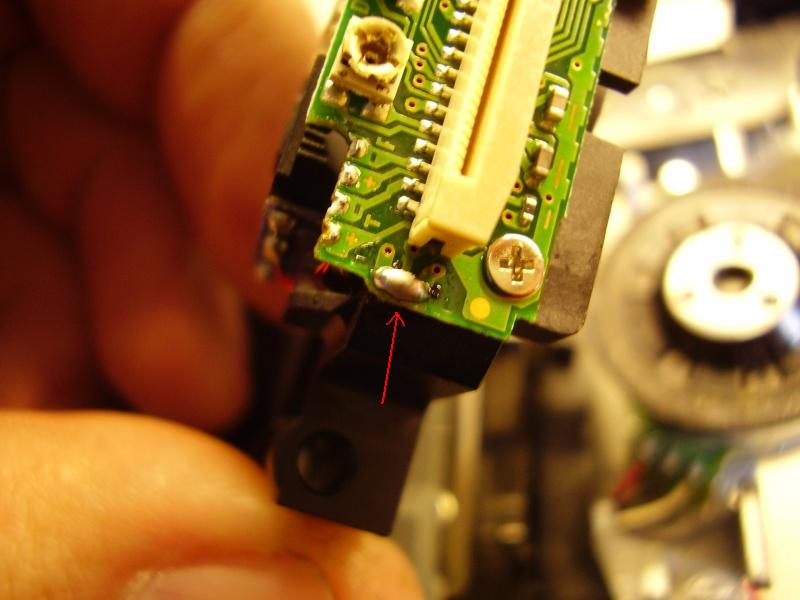
The lens is shipped with a short circuit to protect it against static electricity. Is the clump solder show on the picture(step 10), this must be removed otherwise the lens won’t work. It’s the best to remove the clump as finale step thus after connecting the flat cable.
Slide the lens unit on the axle and insert the axle angled under the clamp in the lower right corner to the east (step11). Hook the axle under the bracket at the left side and then place the clamp back in the lower left corner (step 12). The front axle is now finished.

Step 13 Step 14 Step 15

Let’s put back the back axle. This is the most difficult part to do, or maybe only to explain ?
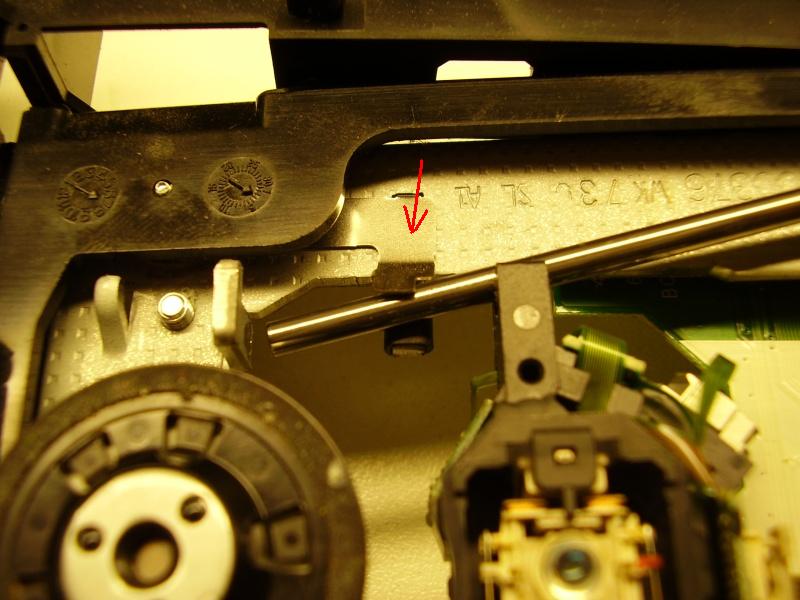
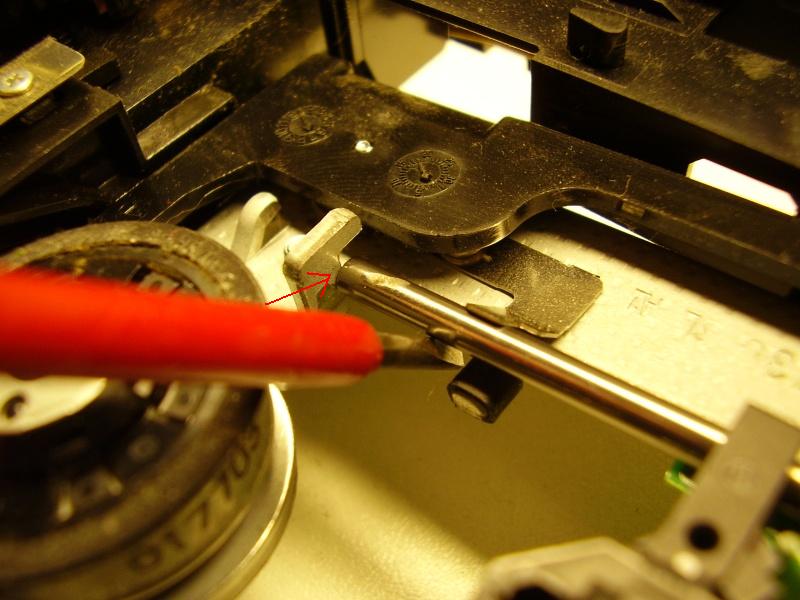
Slide the axle from the east to the west trough the lens unit, then under the clamp in the upper left corner (Step 13). The axle will now hit a metal bracket, lift it gentle up so it can pass it (step 14). Sliding the axle further to the west it will meet a screw, lift it gently up again (step 15) to get it over. Almost finished.

Step 16 Step 17

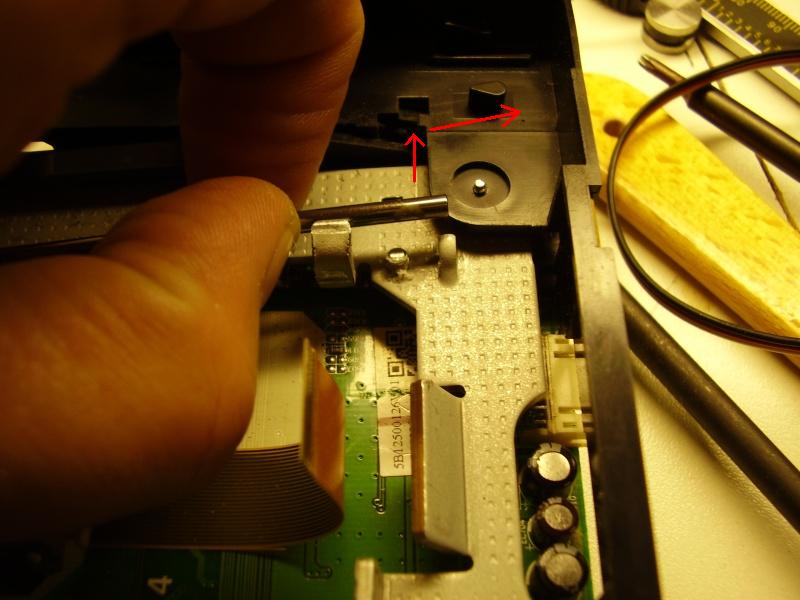
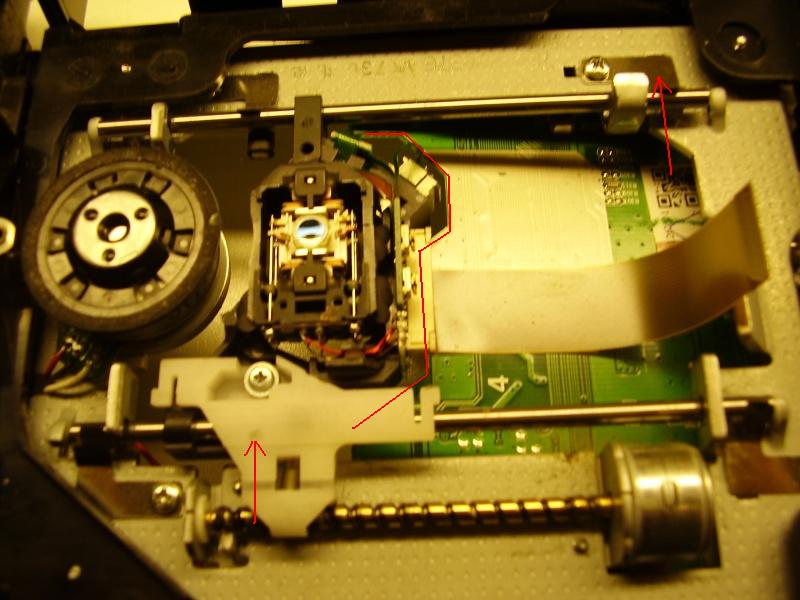
Before we continue its important that the laser unit is now to the left of the pcb(printed circuit board) shown in (step 16) with the red line, so slide the lens unit to the east. Now we can place the back axle back on his final position by hooking it under the metal bracket in the upper right corner and placing back the clamp(Step 16). The lens unit should now slide over the axles, but due the pcb it slides only a few mm to the right and left. Place now back the driving unit by clicking it on the screw axle and screwing it to the lens unit. Connect the flat cable back to the lens unit by opening the clamp (step 17) and insert the cable. Discharge yourself before touching the cable. The flat cable should slide very easy in the connector. Close now the clamps and check of the cable is still inserted far enough.
Now remove carefully the solder clump as show in (step 10) with the soldering iron.
Place back the top and bottom metal case, screw it together with the 4 screws (step1) and you are ready.

Happy gaming.

I2C Eeprom programmer

What is it?
It’s an Eeprom programmer controlled by Bascom Avr and is capable of programming in circuit Eeprom’s up to 512Kb. Standard Intel Hex8 file is required.
Extended Linear Address Records for Eeprom’s bigger then 16bits addresses is not (yet) supported, but easy to implant.
I wrote it primary for my other application note RC2 sound / voice playback to upload the sound files to the i2c Eeprom.
Special thanks to Mark from Mcselec how has added in the vb6 an asm to intelhex routine so Atmel studio is not needed anymore.

Required tools
For the Pc side there’s an upload program that sends the Intel Hex file to the AVR.
Program is written in VB6-Sp6, source code is also available.

The code
Code is written and tested in Bascom 1.11.9.0.001 license.
Download the Bascom source code here


'--------------------------------------------------------------------
'                       I2C Eeprom programmer
'Upload your Eeprom files through serial connection in the I2c Eeprom
'       No extended address supported, so max 512K Eeprom
'     By Evert Dekker 2008 i2cprogrammer@Evertdekker dotje com
'                Created with Bascom-Avr: 1.11.9.0.100
'--------------------------------------------------------------------

$regfile = "m128def.DAT"
$crystal = 16000000
$baud = 19200
$hwstack = 70
$swstack = 70
$framesize = 60

$lib "I2C_TWI.LBX"                                          'Setting up i2c hardware bus
Config Twi = 400000                                         'Hardware i2c bus speed
Config Scl = Portd.0                                        'TWI (i2c) ports on the Mega128
Config Sda = Portd.1
Const Addressw = &B10100000                                 'slave write address eeprom
Const Addressr = &B10100001                                 'slave read address eeprom


Dim Startbyte As Byte , Instring As String * 45 , Complete As Bit
Dim Temp As Byte , Temps As String * 3
Dim Bytecount As Byte , Addresshigh As Byte , Addresslow As Byte , Recordtype As Byte , Databyte(16) As Byte , Checksm As Byte
Dim Lus As Byte , Pos As Byte , Checksum_calc As Byte , Checksum_error As Bit

Enable Urxc
Enable Interrupts
On Urxc Bytereceived_isr


'=== Main  ===
Do
If Complete = 1 Then                                        'Wait until the buffer is filled with one line
  Gosub Process_buffer                                      'Process the buffer
  Gosub Calculate_checksum                                  'Calculate the cheksum
     If Recordtype = &H01 Then                              'EOF finished, send a ACK and return
      Print "Y";
     Else
       If Checksum_error = 0 Then                           'If there's no error continue
         Select Case Recordtype                             'do something with the recordtype
            Case &H00                                       'Data byte
                Gosub Prog_eeprom                           'Recordtype &H00 = databyte, so lets programm the Eeprom
            Case &H02                                       'Extended Linear Address Records, not (yet) supported
               nop
         End Select
       Print "Y";                                           'Checksum ok, send a ACK
      Else
       Print "Z";                                           'Checksum error send a Nack
     End If
    End If
  Complete = 0 : Instring = ""                              'Reset the variable
End If
Loop
End


'=== Subroutines ===
Prog_eeprom:
    I2cstart                                                'start condition
    I2cwbyte Addressw                                       'slave address
    I2cwbyte Addresshigh                                    'Highaddress of EEPROM
    I2cwbyte Addresslow                                     'Lowaddress of EEPROM
       For Lus = 1 To Bytecount
         I2cwbyte Databyte(lus)                             'value to write
       Next Lus
    I2cstop                                                 'stop condition
    Waitms 10                                               'wait for 10 milliseconds
Return


Process_buffer:
Temps = Mid(instring , 1 , 2) : Bytecount = Hexval(temps)   'Read the numbers of bytes
Temps = Mid(instring , 3 , 2) : Addresshigh = Hexval(temps) 'Read the high adress
Temps = Mid(instring , 5 , 2) : Addresslow = Hexval(temps)  'Read the low adress
Temps = Mid(instring , 7 , 2) : Recordtype = Hexval(temps)  'Read the recordtype
For Lus = 1 To Bytecount                                    'Process the number of data bytes
      Pos = Lus * 2
      Pos = Pos + 7
      Temps = Mid(instring , Pos , 2) : Databyte(lus) = Hexval(temps)       'Read the databytes
Next Lus
Pos = Pos + 2                                               'read the last byte
Temps = Mid(instring , Pos , 2) : Checksm = Hexval(temps)   'Read checksum
Return


Calculate_checksum:
Temp = 0                                                    'Add up all the databytes
Temp = Temp + Bytecount
Temp = Temp + Addresshigh
Temp = Temp + Addresslow
Temp = Temp + Recordtype
   For Lus = 1 To Bytecount
    Temp = Temp + Databyte(lus)
   Next Lus
Checksum_calc = 256 - Temp                                  'taking its two's complement
   If Checksum_calc <> Checksm Then                         'Compare it with the readed value
    Checksum_error = 1
   Else
    Checksum_error = 0
   End If
Return

Bytereceived_isr:
Temp = Udr                                                  'get the binary value that came across
If Temp = &H0D Then                                         'Received CR = end of line, line complete
 If Len(instring) < 8 Then                                  'To short, startover again
   Complete = 0
   Instring = ""
 Else
   Complete = 1                                             'String is complete set the flag
 End If
End If

If Startbyte = &H3A Then                                    'we have previously received the start byte and this is now data
  If Temp > &H0F Then                                       'Add incoming data to buffer
     Instring = Instring + Chr(temp)
    If Len(instring) > 45 Then Instring = ""                'String is to long, reset and startover again
 End If
End If

If Temp = &H3A Then                                         'if we received an : then its the beginning of an new line.
   Startbyte = Temp
   Complete = 0
   Instring = ""
End If
Return