Talking dice

A long time ago when i started with electronics one of my first projects was a talkingdice from the Elektor magazine November 1982.
It was based on the Texas instruments TMS5100 speech chip. The eprom was programmed with dutch speech code and it was working reasonably, considering the year (1982) it was not bad at all.
It could only speak from 1 to 6 with no visual feedback.
After all these years Elektor has never made a modern version of the talking dice and it looks fun to me to make a new dice and send it to Elektor for publishing in there magazine, but after keeping me warm for 2 years they decided not to publish it anymore.
Now it’s on my own website that has more readers then Elektor these days Smile

This talkingdice is based on my RC2 decoder / soundplayback and will produce much better sound-quality with visual feedback and the option to throw with 1 or 2 dices.
You can choose between 1 or 2 dices by keeping de roll button pressed during start-up.
For the enclosure i have used a transparent Straapubox red (Conrad 528347). It gives a nice finish and make the leds better visible.They are also available in other colors, so let your creative flow.
The current through the leds is limited to 8mA to extended battery life time and prevent that the maximum source current of the M88 will be exceeded.

Schematic
Sprekendedobbelsteen Elektuur 1982
Talking Dice
Dice open enclosure
Finished Dice
Finished Dice
PlayPause
previous arrow
next arrow
 
Schematic
Sprekendedobbelsteen Elektuur 1982
Talking Dice
Dice open enclosure
Finished Dice
Finished Dice
previous arrow
next arrow


Download here your stuff if you want to make one yourself.
Eagle cadsoft pcb & schematic
Hexfiles ready to run
Source code written with Bascom-Avr
Voicefiles

If you want to do more, for example make you own voice files with your own voice, read this and  specially the RC2-Howto.pdf in this download.

3.5″ 320×240 Color touch screen

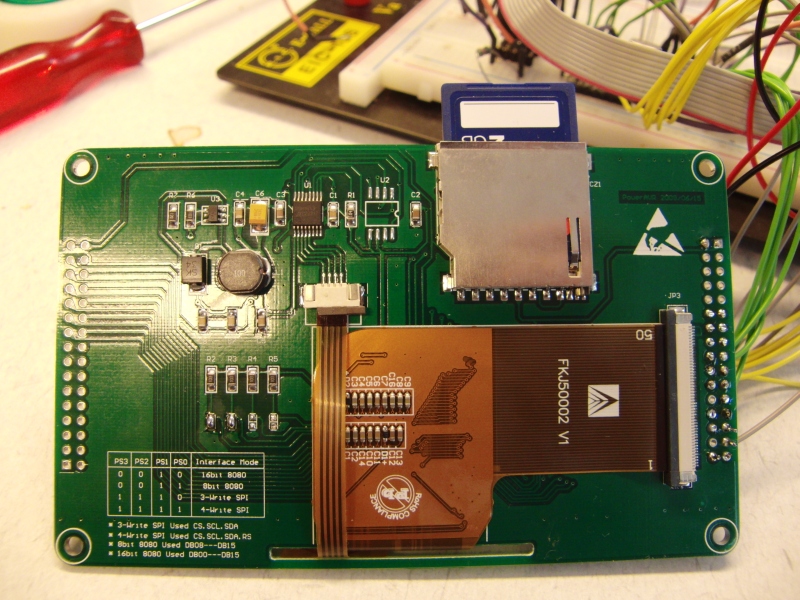
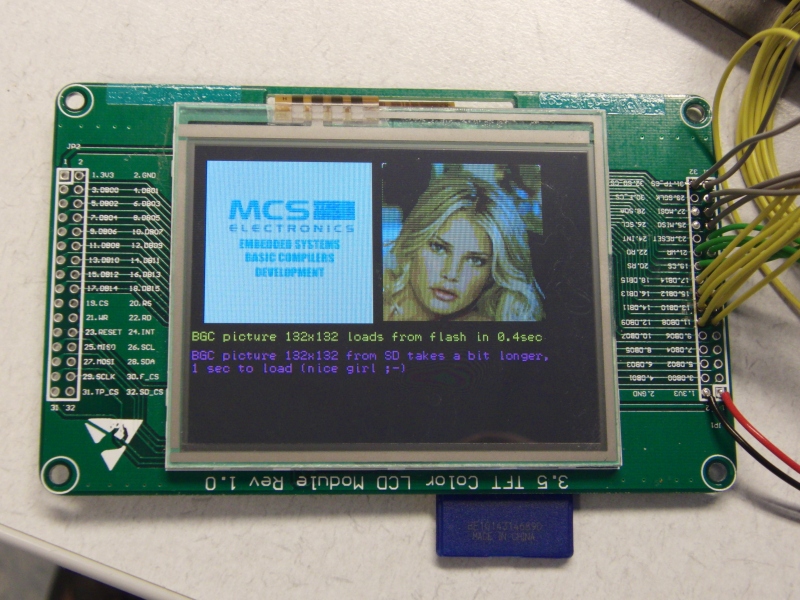
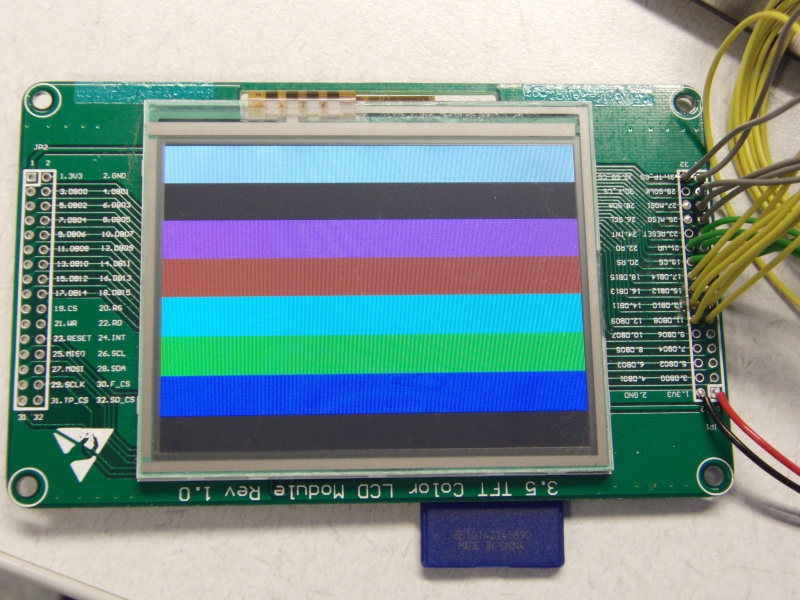
On ebay i found this very nice and cheap tft display .It contains a tft color screen with 320x240 pixels, touch-controller and Sd card reader.
The display controller used is the SSD2119 and for the touch controller they used ADS7843.
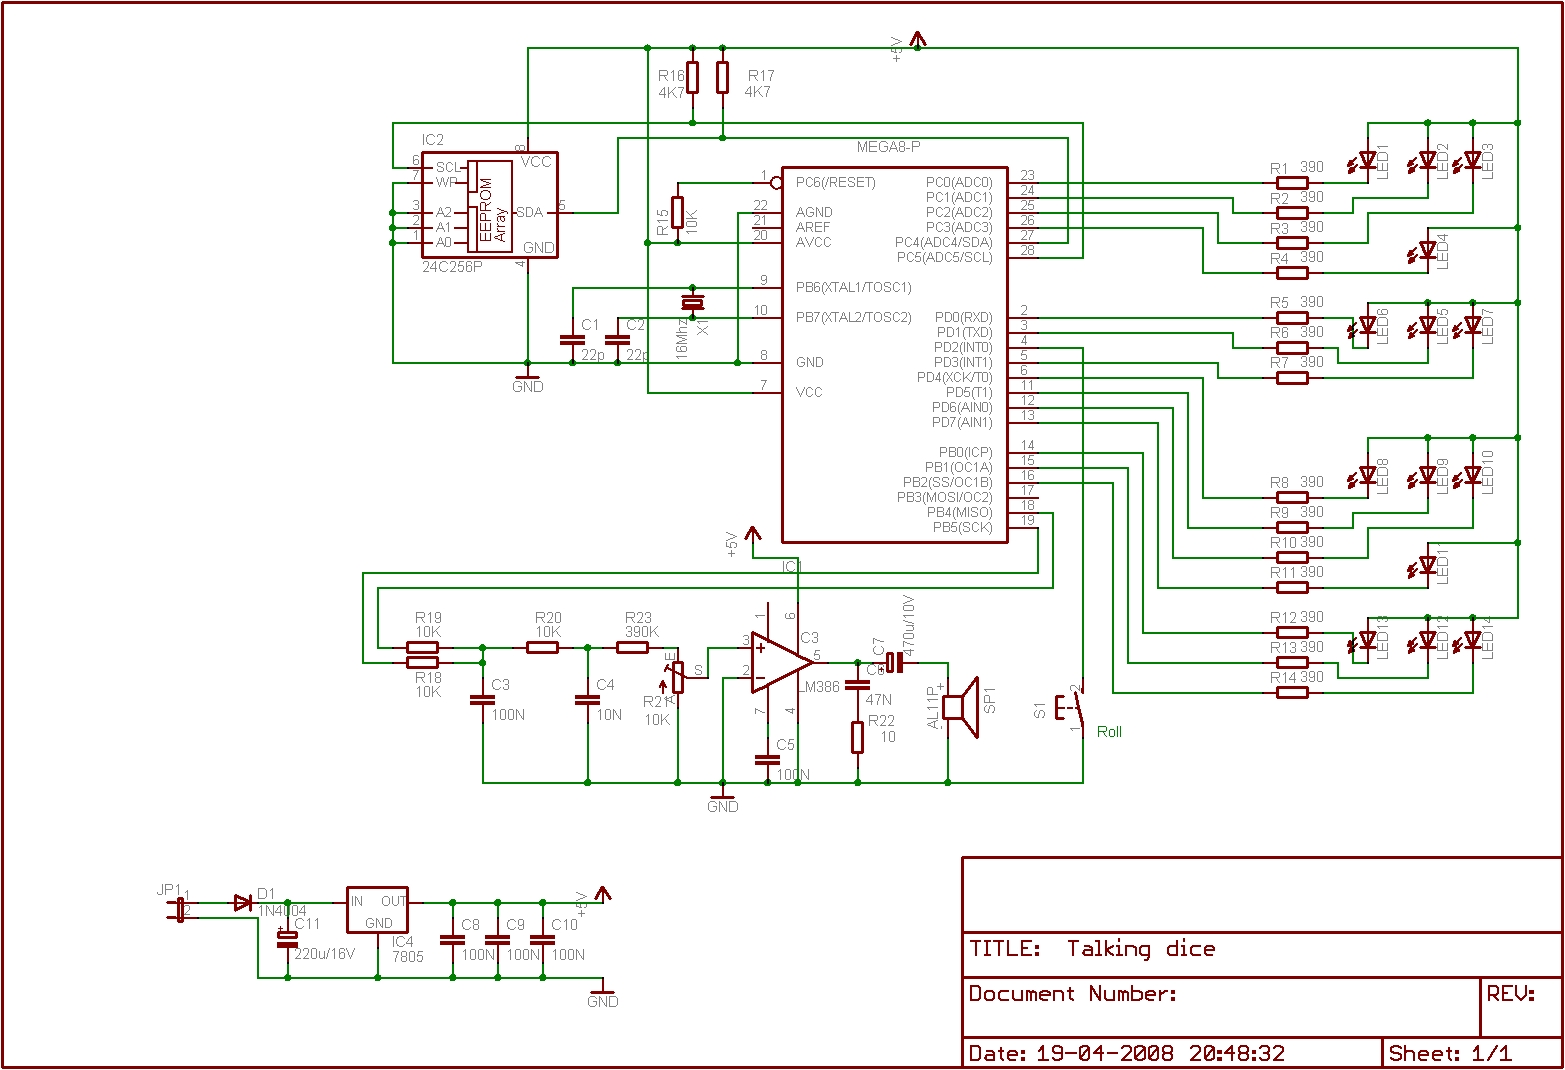
Demo is running on Atmel Avr M1284P @16Mhz with Bascom 1.12.0.0

Jumpers
Back Display
Demo
Demo
PlayPause
previous arrow
next arrow
 
Jumpers
Back Display
Demo
Demo
previous arrow
next arrow
3.5" 320x240 Color TFT Demo with touchscreen, Bascom and SSD2119 controller

Some Notes:
-- 320x240x16bits needs enormous amount of data and cpu power to get something on the screen, don’t expect live video @25fps. Take a look at the video to get an idea of the performance.
-- To get the display compatible with the Bascom 8bit BGC (Bascom Grapichs Color) files, the 8bits color are up-scaled to 16bits. Therefore the colors are maybe not always correct, you can adjust this in the look-up table.
-- The size of the BGC are limited to 255x255 pixels.
-- The 24bit colors of the BMP files are downscaled to 16bits by simply dropping the LSB.
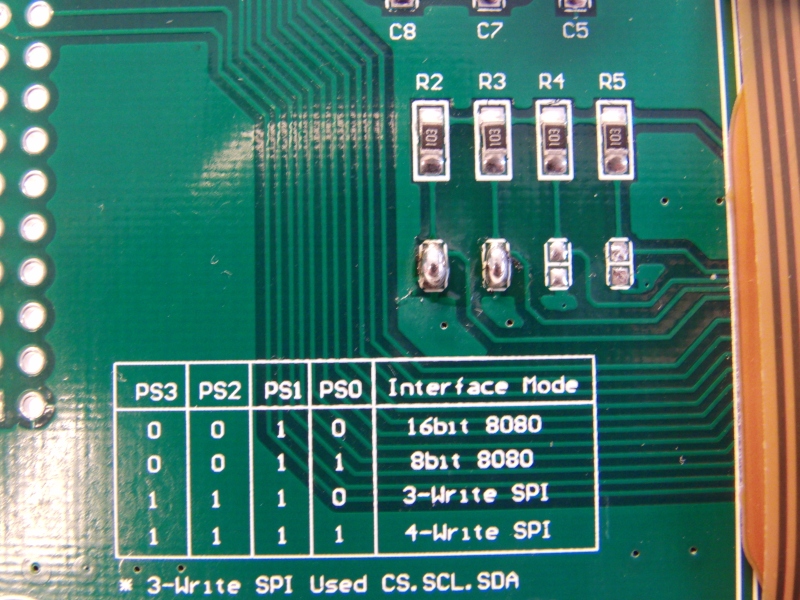
-- Jumpers setting of the display board  are a bit strange, make the soldering connection is a logic 0 and removing the solder is a logic 1.
-- The touch controller needs Polarity =low and Phase =0 for the spi communication, the Sd cards needs Polarity =high and Phase =1. To overcome this problem in the readtouch function’s the Polarity and Phase are changed at the beginning of the function and changed back at the end.
-- Display works on 3.3V so use a level converter or an AVR that can run on 3.3V.
-- Add the Spiin = 255 option to the Config Spi line in Config_mmc.bas if your using the touch and sd-reader, else it won’t work.

3629 Downloads


Syntax

Lcdtext string, x , y , fontset , forecolor , backcolor

Remarks

String String to be displayed
x  Constant or variable with x position.
y  Constant or variable with y position.
fontset  Fontset to be used to display the text
Forecolor  RRRRRGGGGGGBBBBB
Backcolor  RRRRRGGGGGGBBBBB


This will show text on the lcd. It uses the Bascom FONT files for compatibility.
To add or remove fontsets modify these lines in the subroutine;

If Fontset = 1 Then Restore Font8x8
If Fontset = 2 Then Restore Font16x16
If Fontset = 3 Then Restore Font6x8
If Fontset = 4 Then Restore Font5x5

Sorry, but there was no better solution.
These are the name’s that you gave to the font, NOT the file-name if you don’t know the font name, open the font file in the font editor, and there it is, right on top.
Don’t forget to $Include your font files at the end of the program.


Syntax

Lcd_showpicture_bmp Filename, x , y

Remarks

 Filename  Filename of Windows BMP file (24bpp)
 x  Constant or variable with x position.
 y  Constant or variable with y position.


This will show Windows 24bpp BMP from the sd card. The 24bpp colors are downscaled to 16bpp.
Requires Avr-dos.


Syntax

Lcd_showpicture_sd Filename, x , y

Remarks

 Filename  Filename of Bascom BGC file
 x  Constant or variable with x position.
 y  Constant or variable with y position.


This will show Bascom BGC (Bascom Graphics Color) file from the sd-card. The 8bpp colors are up-scaled to 16bpp with the help of a look-up table. In this table you can adjust the colors if necessary.
Requires Avr-dos.


Syntax

Lcd_showpicture  x , y

Remarks

 x  Constant or variable with x position.
 y  Constant or variable with y position.


This will show Bascom BGC (Bascom Graphics Color) file from the flash memory. The 8bpp colors are up-scaled to 16bpp with the help of a look-up table. In this table you can adjust the colors if necessary.
Important that you first Restore the picture, for example;
Restore Girl                                                ‘FIRST restore you image before you can show it
Lcd_showpicture_sd “girl.bgc”, 150 , 10


Syntax

Lcd_line  x1, y1 , x2 , y2 , color

Remarks

 x1  Starting horizontal location of the line.
 y1  Starting vertical location of the line.
 x2  Horizontal end location of the line.
 y2  Vertical end location of the line.
 color  RRRRRGGGGGGBBBBB


Draws a line on the lcd.


Syntax

Lcd_clear  backcolor

Remarks

 backcolor  RRRRRGGGGGGBBBBB


Clears the lcd in an specified color.


Syntax

Lcd_pset  x, y , color

Remarks

 x  The x location.
 y  The y location.
 color  RRRRRGGGGGGBBBBB


Set a pixel on the lcd.


Syntax

Lcd_Setcursor  x, y

Remarks

 x  The x location.
 y  The y location.


Set the ram address (cursor) to the specified position.


Syntax

Write_data  data16

Remarks

 Data16  Word


Write 16bit data to the lcd


Syntax

Write_Command  Command

Remarks

 Command  Word


Write 16bit command to the lcd


Syntax

Lcd_reset

Hardware lcd reset


Syntax

Lcd_init

Init the lcd


Syntax

Lcd_home

Set the ram address (cursor) to the home position


Syntax

A= Rgb16  rgb8

Remarks

 A  16bpp RGB Word
 rgb8  8bpp RGB


Convert 8bpp color to 16bpp color.


Syntax

A= Readtouch_X

Remarks

 A  12 Bit x position
 rgb8  8bpp RGB


Reads the X coordinates from the touchscreen.


Syntax

A= Readtouch_Y

Remarks

 A  12 Bit y position
 rgb8  8bpp RGB


Reads the Y coordinates from the touchscreen.


Rs-485 Hub Smd


My old Rs-485 hub was getting to small to connect all the device from my Joshua domotica.
Designed a new one with smd components to reduce the size.
The line drivers SN75176 are still dip-8 to change them easy when there’s one broken, not that they ever breakdown (last 10 years zero) but you never know.
It’s stack able for extending the ports.


Schematic
3D Design
Finished
Finished
PlayPause
previous arrow
next arrow
 
Schematic
3D Design
Finished
Finished
previous arrow
next arrow


Download schematic and Eagle pcb files:

2371 Downloads

Bascom Bootloader Pc-side


This program is compatible with the Bascom Avr-Bootloader as it’s shipped with Bascom 1.11.9.9.
You can program the flash with it, but not the eeprom, feel free to modify the code and share it with us.
It’s written in Vb6 and uses the (Free) McsCom module from Mcselec.com for communication.

Tested with Bascom 1.11.9.9, Mega8 and M128.

Download now inclusief source code.

2292 Downloads

Screenshot.JPG

Vpn with Nokia N900 and Fritzbox

This is an small tutorial to connect your Nokia N900 phone with you network at home or work with an secure VPN connection. Very handy for printing at home, accessing you nas or where i´m using it alot for, Remote desktop from your N900. As VPN server i wanted to use my Fritzbox because it´s already there to communicate with the rest of the world.
The build in VPN functionality of the Fritzbox was not compatible with the OpenVpn that was used on the N900, so OpenVpn was also needed on the Fritzbox.

To begin with i have used this article. The author used it to connect 2 Fritzbox together.
Using this tutorial requires some basic knowledge of Linux, but if you have the N900 then you´re have else you have an iphone.Smile and Steve Jobs determine what you’re doing with it.
First of all some warnings, you can really mess up your N900 or Fritzbox or even delete the whole Internet. Don´t blame me, i´m just some nerd that´s typing this tutorial for you.

Tested it with Fritzbox 7170 with firmware version 58.04.74, Nokia N900 version 3.2010.02.

  1. First we need to download and install OpenVpn and OpenVpn Applet on the N900. The both can be found in the extra-devel repository.
  2. On the Fritzbox we must enable Telnet, this can be done by dialing on the land-line phone connected to the Fritzbox #96*7*
    You can now make an telnet connection with your favourite program to the Frtizbox. The password is the same as for the web interface of the Fritzbox.
  3. The Fritzbox has not enough internal storage to store the Openvpn program. To overcome this problem we use an usb-stick(or external hdd). Make on your usb-stick the subdirectoy vpn. You van do this in your (windows) pc. Keep in mind that we are working with Linux so everything is case sensitive.
  4. Lets make the necessary script and configuration files, or if you really lazy download them. And place the in the correct maps.
    Debug.cfg (Place in the root of the Usb-stick)
    mkdir /var/usb
    mount /dev/sda1 /var/usb
    /var/usb/startup.sh
    startup.sh (Place in the root of the Usb-stick)
    echo Starting telnetd
    /usr/sbin/telnetd -l /sbin/ar7login
    # wait until the DSL connection is establist
    echo Waiting for internet connection
    while !(ping -c 1 www.google.com); do
    sleep 5
    done
    # tun-Device creating if not available yet
    echo Creating TUN device
    mknod /var/tmp/tun c 10 200
    # start OpenVPN
    echo Starting OpenVPN
    cd /var/usb/vpn
    ./openvpn –config Server.ovpn –daemon

    Server.ovpn (Place in the vpn map on the Usb-stick)
    dev tun0
    dev-node /var/tmp/tun
    ifconfig 10.8.0.1 10.8.0.2
    secret /var/usb/vpn/static.key
    keepalive 10 60
    Client.ovpn (Place in the Mydoc directory or sd-card of your N900)
    remote Your.Domain.name
    dev tun
    ifconfig 10.8.0.2 10.8.0.1
    secret static.key
    keepalive 10 60
    ping-timer-rem
    persist-tun
    persist-key
    #route must be in the same subnet as your network
    route 192.168.1.0 255.255.255.0

  5. Download openvpn for your Fritzbox,  unzip it and place the contens on your usb stick in the vpn directory. Place now the usb-stick in your FritzBox.
  6. Now lets mount the usb-stick ;
    mkdir /var/usb
    mount /dev/sda1 /var/usb
    And copy the debug.cfg to the flash directory so that the debug.cfg will executed during the next reboot;
    cat /var/usb/debug.cfg > /var/flash/debug.cfg
  7. Lets make now the key file needed for the vpn connection;
    cd /var/usb/vpn
    ./openvpn --genkey --secret static.key

    Copy this key also to you N900  in the same directory as you used in step 4.
    You need the key to make an secure connection, but it’s a key so don’t lose it.
  8. We need also forward the vpn udp port 1194 to the Fritzbox himself. Fritz doesn’t allow this using the webinterface, so we must do it by hand using nvi (works the same as vi).
    Now where are gone editing the config file of the Fritzbox becarefull you can mess it really up now!
    cd /var/flash
    nvi ar7.cfg
    Find now the section that’s named  forwardrules = if you have already some ports forwarded you see them here also.
    There are multiply forwardrules, but there’s only one that is named only forwardrules. If you doubt, make an dummy port forwarding in the webinterface and search for that one.
    Now add the following line to the section
    "udp 0.0.0.0:1194 0.0.0.0:1194 0 # OpenVPN",
    Don’t forget the comma at the end and save the file. If it’s the last entry the comma should be an ;
  9. Settings should be finished now, lets reboot the Fritzbox by typing reboot.
    After reboot login again with telnet and check if Openvpn is running by typing ps.
    You should see a process running that called openvpn, for example;
    654 root       1600 S   ./openvpn –config Server.ovpn –daemon
    If not try rebooting again or you (or me) has made an mistake in the previous 8 steps.
  10. Final we need configure the settings on the Nokia N900. That’s very easy to do, tap in the status bar on the Openvpn button and choose manage connections.
    Choose new and then select for the configuration file Client.ovpn that we made in step 4. For key file you take the static.key file that we created in step 7.
    Press import to finish. You can use the test button to test the connection. There’s a lot info on the test screen, but when the connection is successfully the last 2 lines are Peer connection initiated withYourIp and Initialization Completed.
  11. It’s ready to be used now!
    Bear in mind that 90% of all connection problems encountered by OpenVPN users are firewall/port forwarding related.For more info about OpenVpn just click